
Rosemaling Mittens – Embroidery Tips
Embroidery is a wonderful way to add detail and adorn your knits with something extra special. For this post on the blog we’re taking you through the process of adding the flower motif to the Rosemaling Mitts from Loop’s 10.
 Make sure you read to the end of the post to find out how you can win an embroidery book!
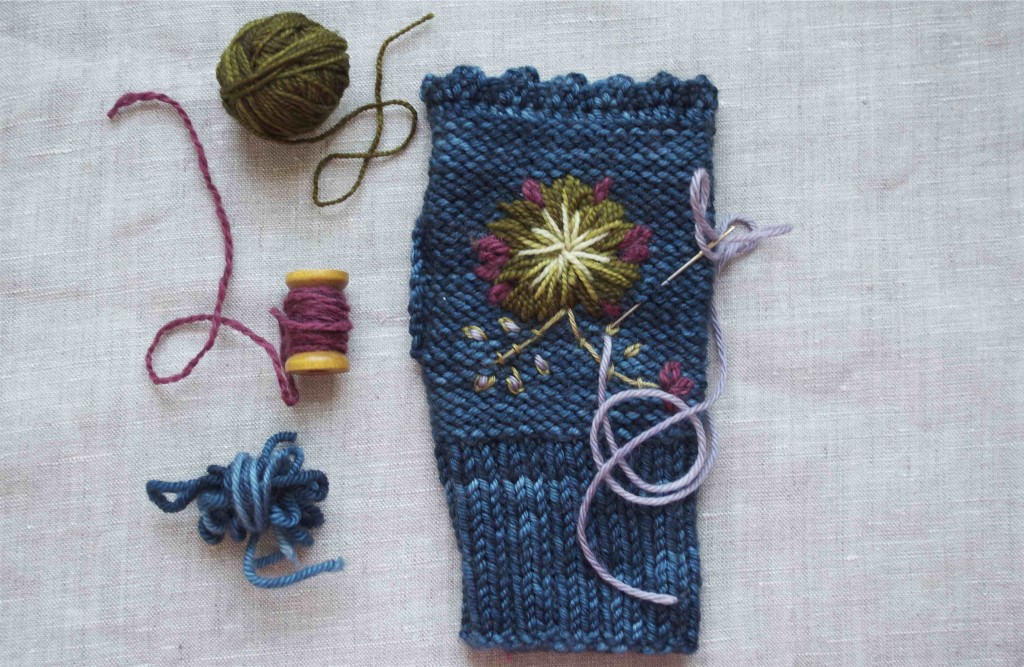
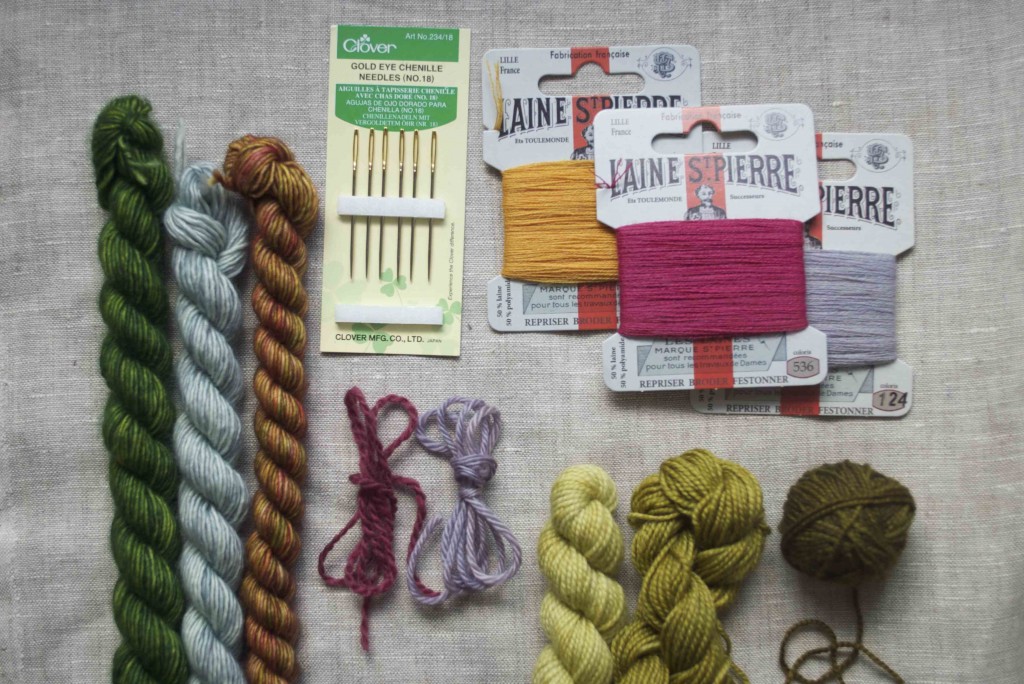
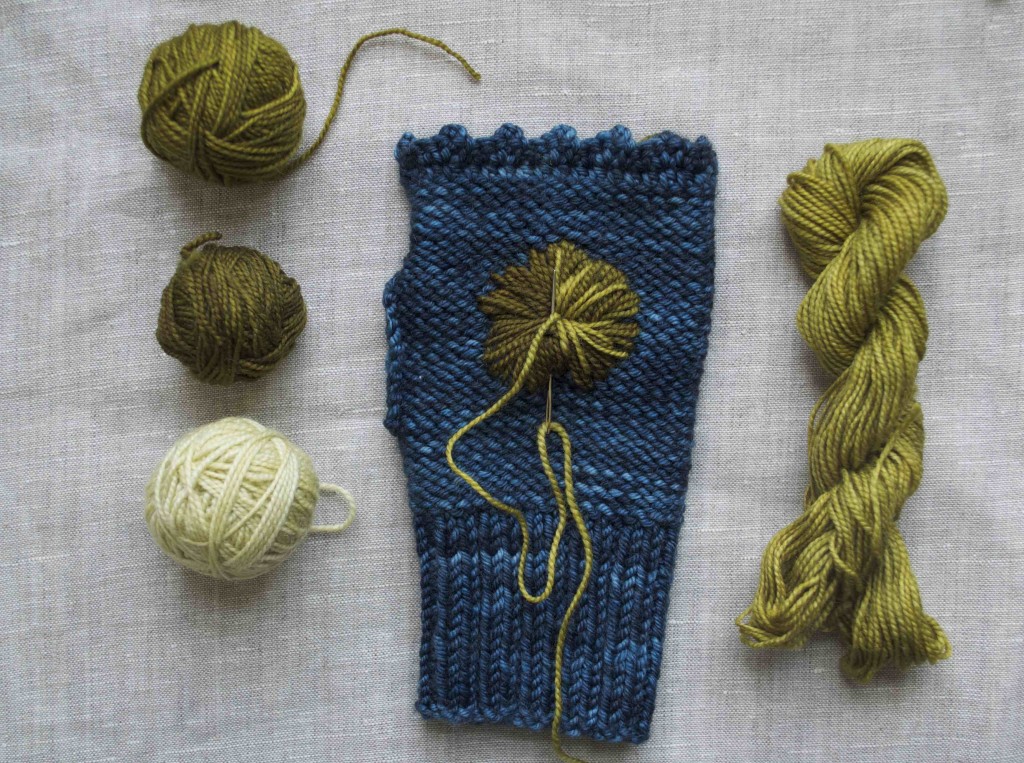
We’re using the Pigeon Roof Studio Mini Skeins in Pistachio for the main part of the embroidery. The gradient shades and high twist of these little skeins make them ideal for this project. We also recommend the Madelinetosh Unicorn Tails and St. Pierre Darning threads as they come in small amounts and a huge range of colours. Plus you could also use any scraps you find in your stash! Needle wise, try a chenille needle as these have a pointy tip and a large eye.
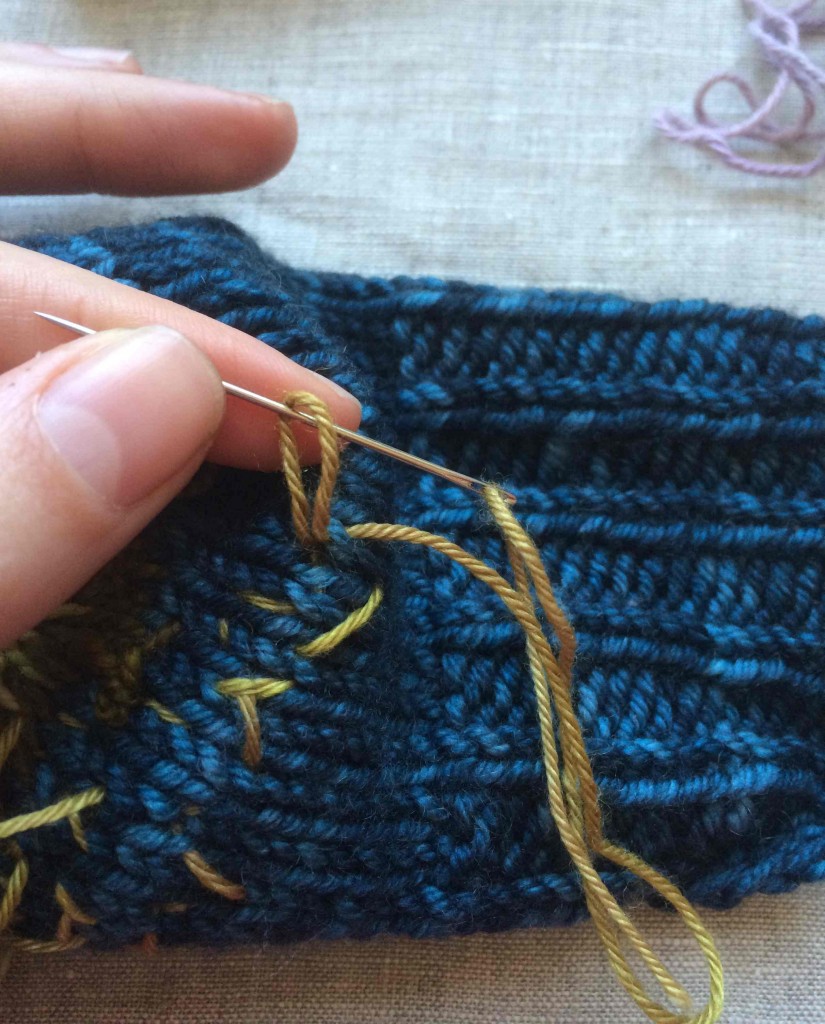
Sew the mitts together using mattress stitch, remembering to leave a gap for your thumb. As the purl side of stocking stitch is the right side for this project, you’ll be working mattress stitch in a slightly different way.
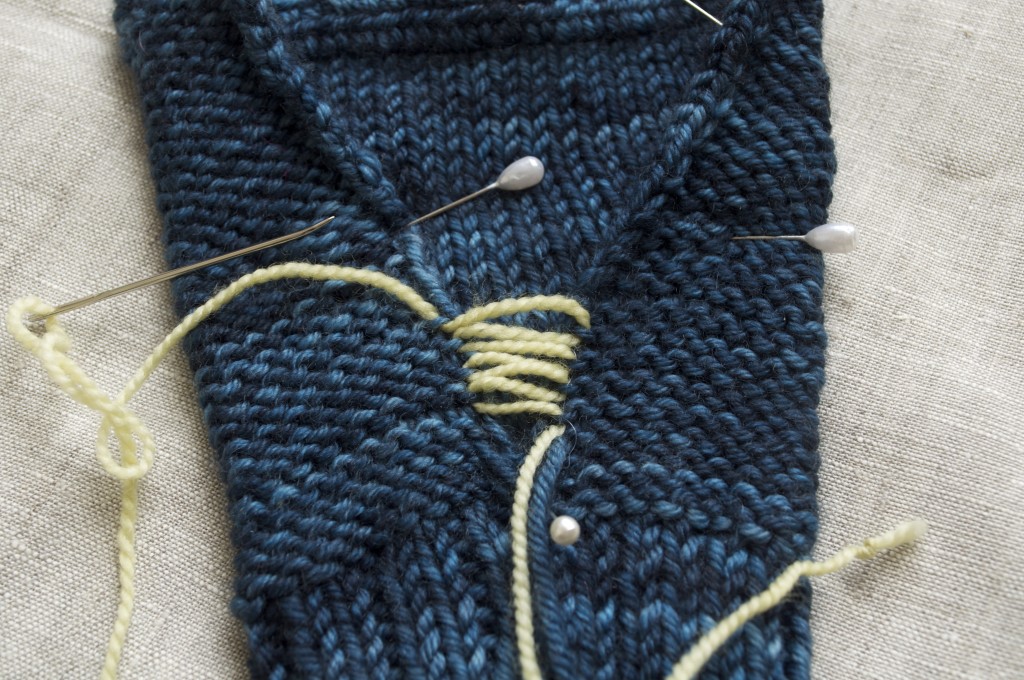
With the right sides facing you and the edges of the piece lined up, weave your needle back and forth catching the bottom ‘bump’ of the wave of each row. We’ve shown it here in a contrast colour. To get started it can help to look at the knit side and identify the ‘bar’ you need to pick up (more tips on mattress stitch here)
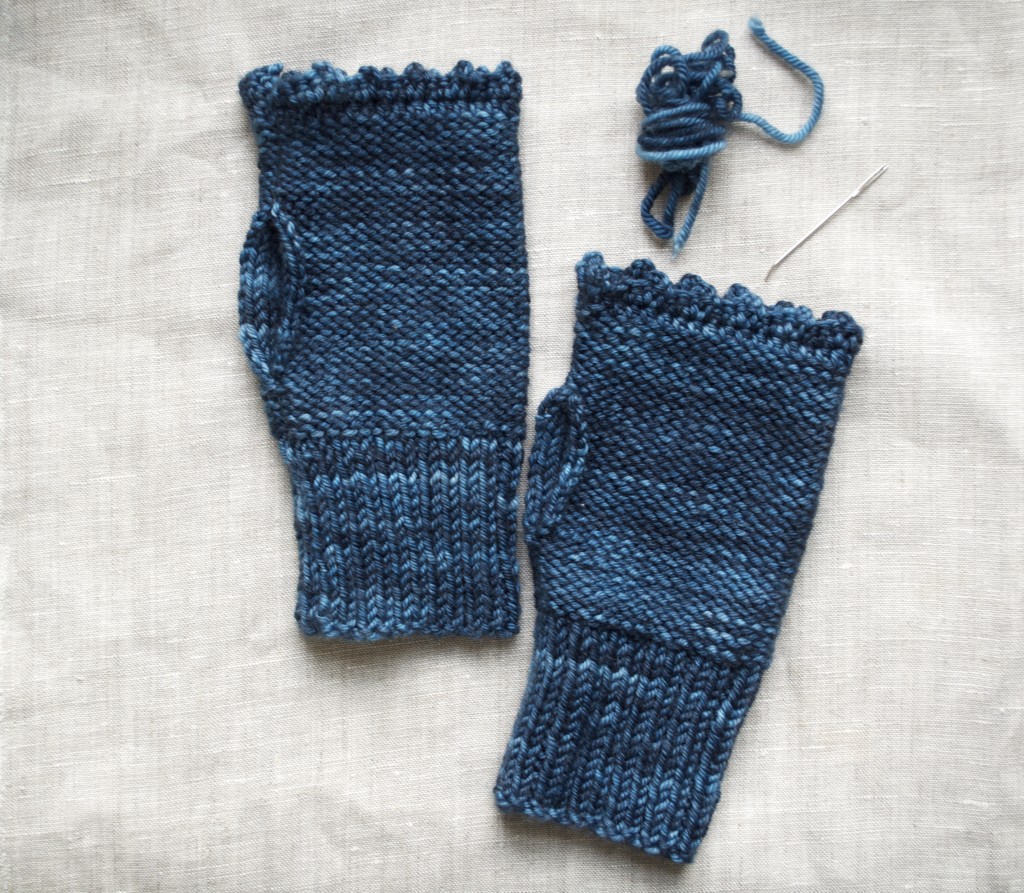
Once your mitts are sewn together, block to measurements being careful not to stretch the rib and leave to dry thoroughly.
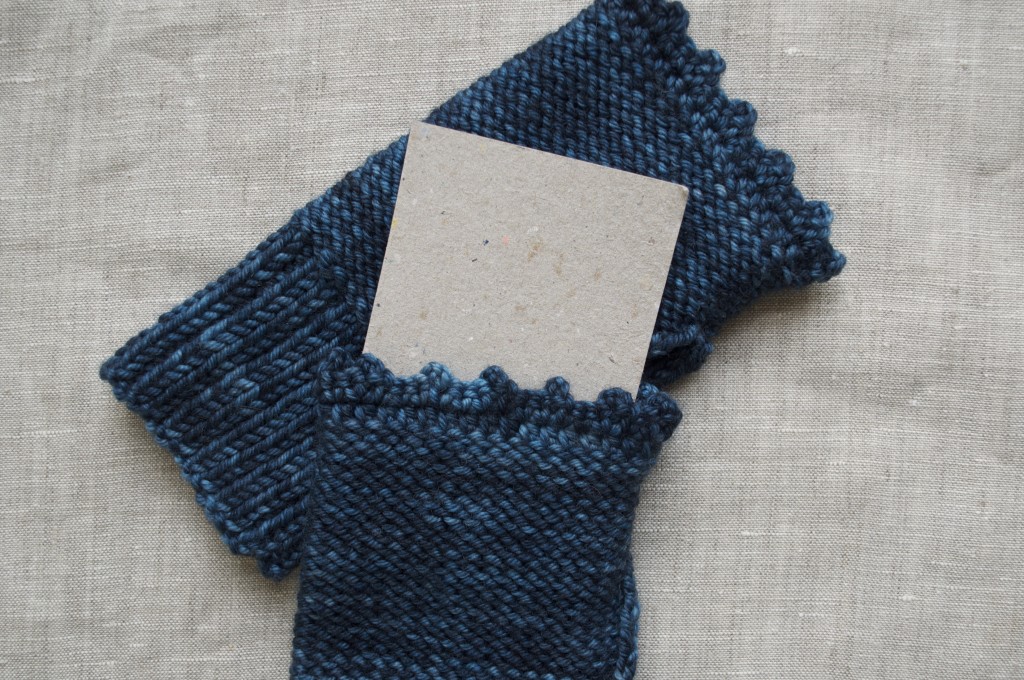 To make sure you don’t catch the other side of the fabric while you are sewing, cut a small rectangle of cardboard to slip into the mitts.
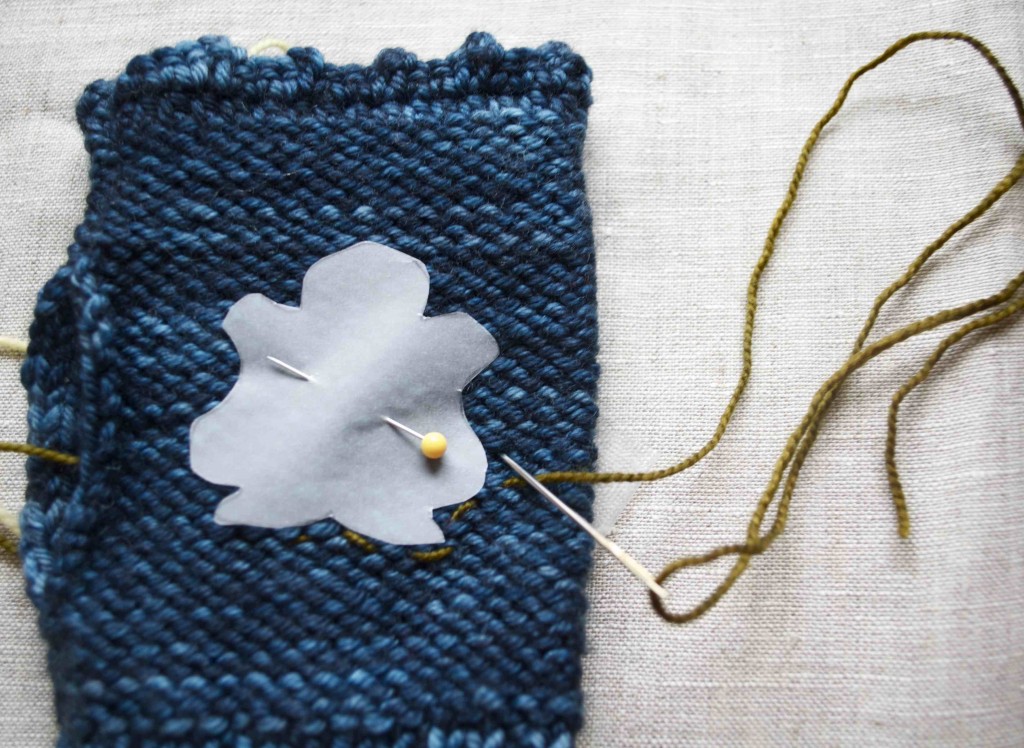
The pattern suggests making a stencil of the flower design. We copied the image using tracing paper (but you could use greaseproof paper in a pinch) cut out the main shape and pinned this to the mitt. Look at the pattern photography to help with placement and you might like to (carefully!) try on the mitt to decide where the flower should sit. You could even use washi tape to mark out where the design will be.
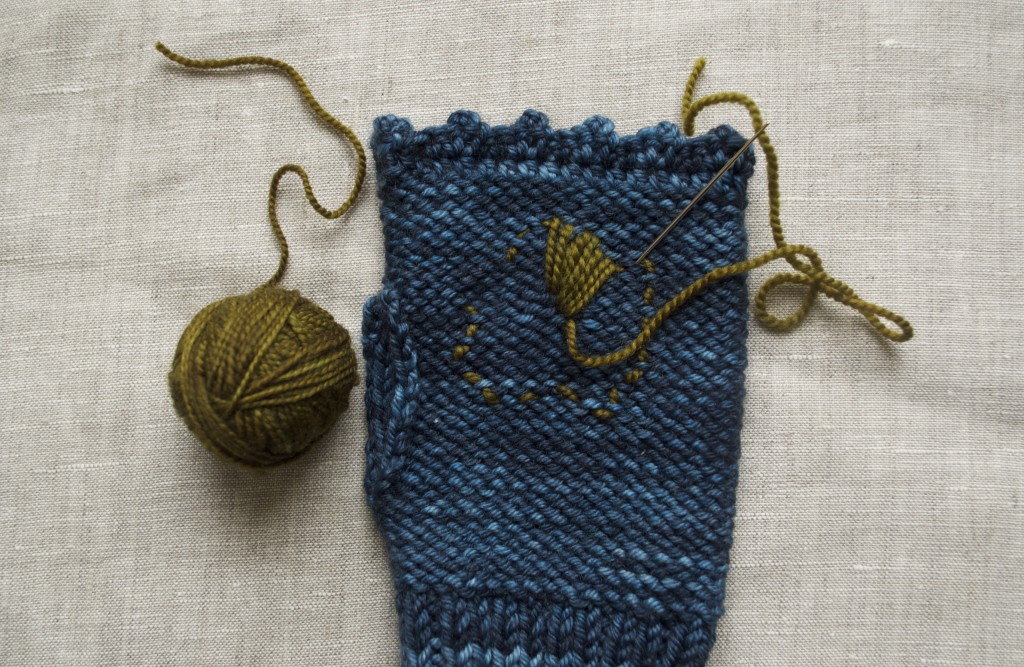
Take the darkest colour of yarn and use running stitch to mark the outline of the stencil of the flower. Remove the stencil and using long and short stitches of satin stitch (a flat stitch that covers the background) work round in a spiral to fill the petal shape. Try to vary the central point that your needle enters slightly so that the middle doesn’t get too over crowded. Don’t worry if there are gaps as you’ll be able to fill these in later.
As with knitting, the even tension of your stitches is still just as important! You’ll need to strike a balance between making sure that you are not pulling too tight and distorting the knitted fabric (which still needs to stay stretchy so you can put on the mitt) and not leaving the stitches too loose so they catch. If you are unsure, why not practise on a little swatch first?
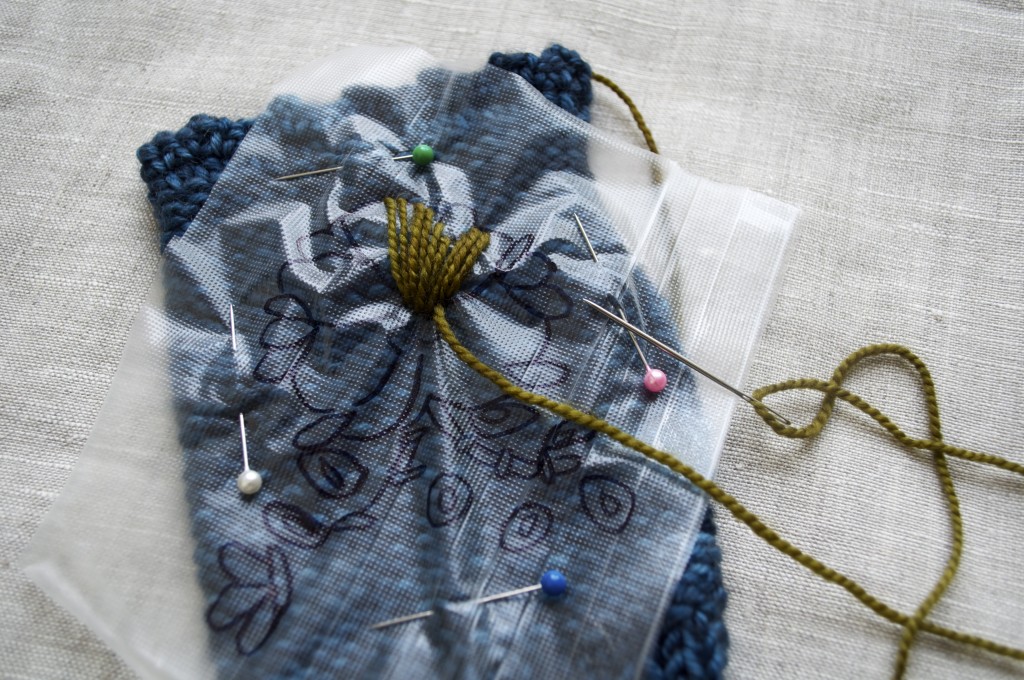
If you prefer to have a more definite guide we suggest water-soluble embroidery film, available from craft shops or online. You can trace the outline of the design (we found permanent marker was the most effective drawing tool and will not leave a mark afterwards) and then use this guide to help you plot the position of the flower.
Finish the ends by working a small stitch at the back, being careful not to pull the yarn all the way through so you make a little loop. Pass the needle through this loop, pull the yarn taut to fasten and weave the ends through the fabric as you would when knitting.
Make sure you are working on both mitts at the same time to ensure the woolly tattoos are the same. Or if they don’t look the identical, aim for sisters rather than twins!
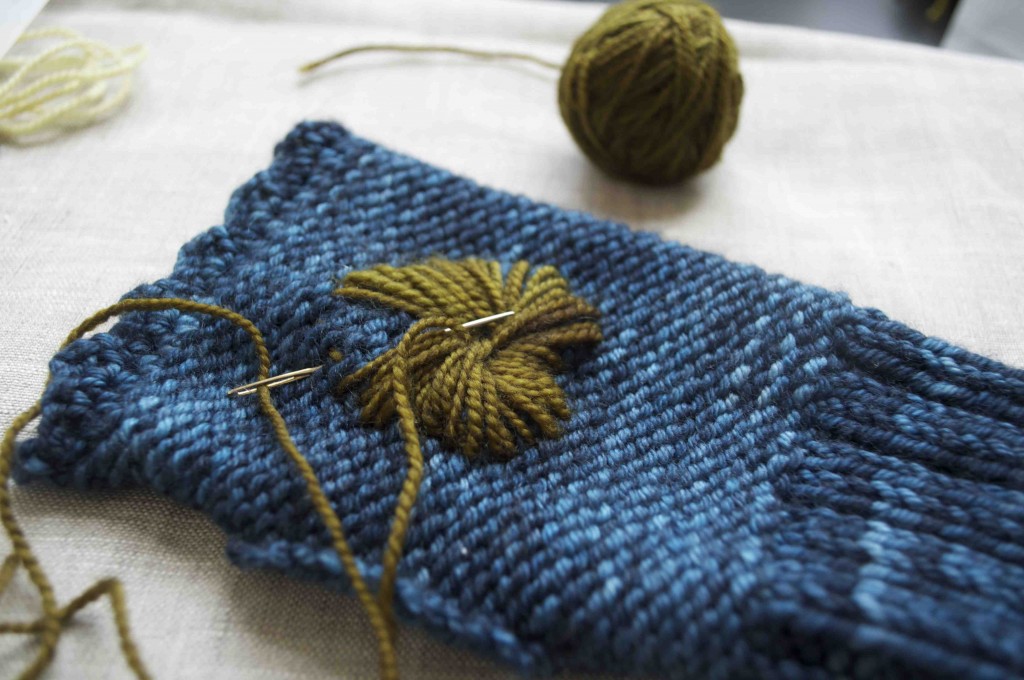
Change to the next lighter colour and continue to work in the same way, filling the petals and building up layers of the different colours.
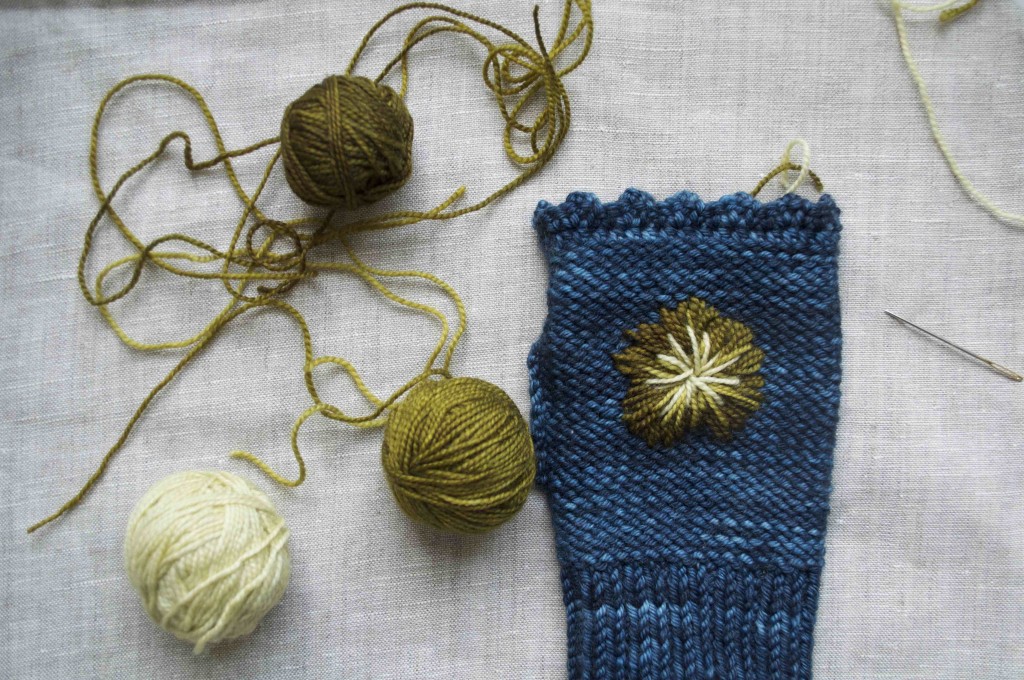
Continue adding layers of satin stitch until you are happy with the colours and shape.
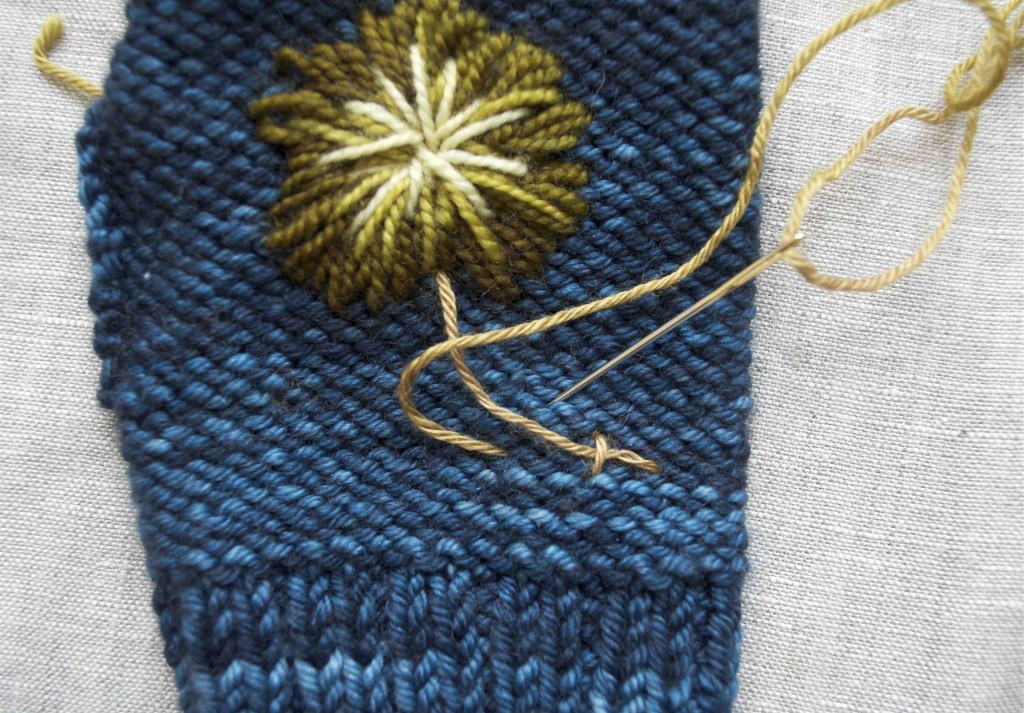
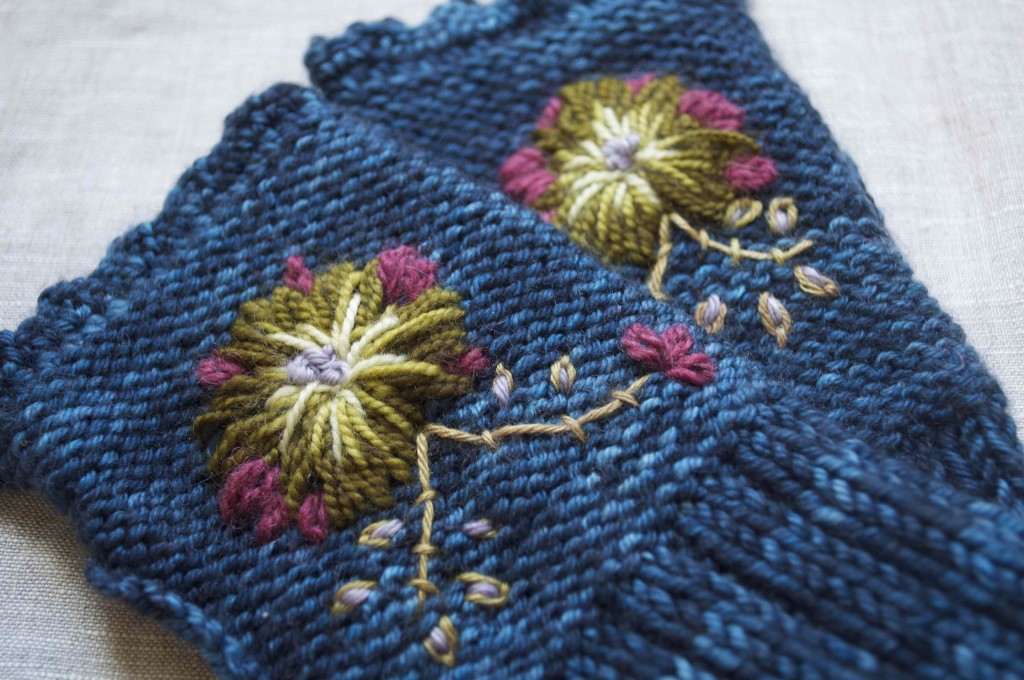
Next add two branches using couch stitch – we’ve used some of Dye for Yarn’s Merino Silk in Golden Beehive to create some delicate tendrils. For couch stitch, make one large, loose stitch and secure in place with several smaller back stitches across the length to tack it into place.
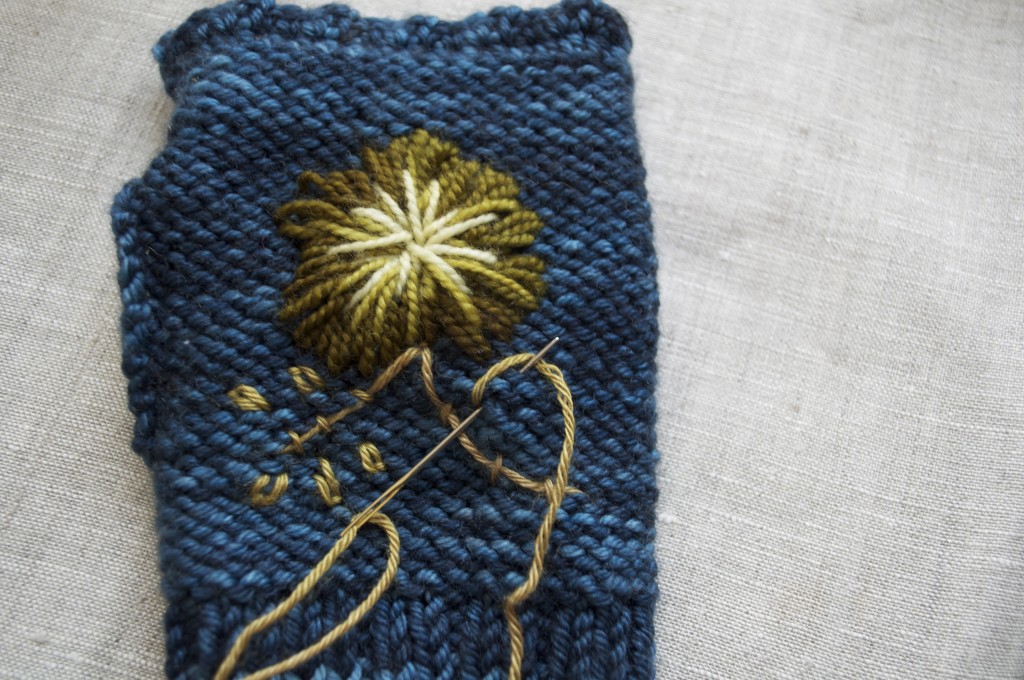
In the same colour, add little leaves around the branches using lazy daisy stitch – bring the needle up and out of the fabric and enter back just where you came out, making sure to not pull the thread all the way through as this will be the petal loop.

Then catch the top of the petal loop with a small stitch.
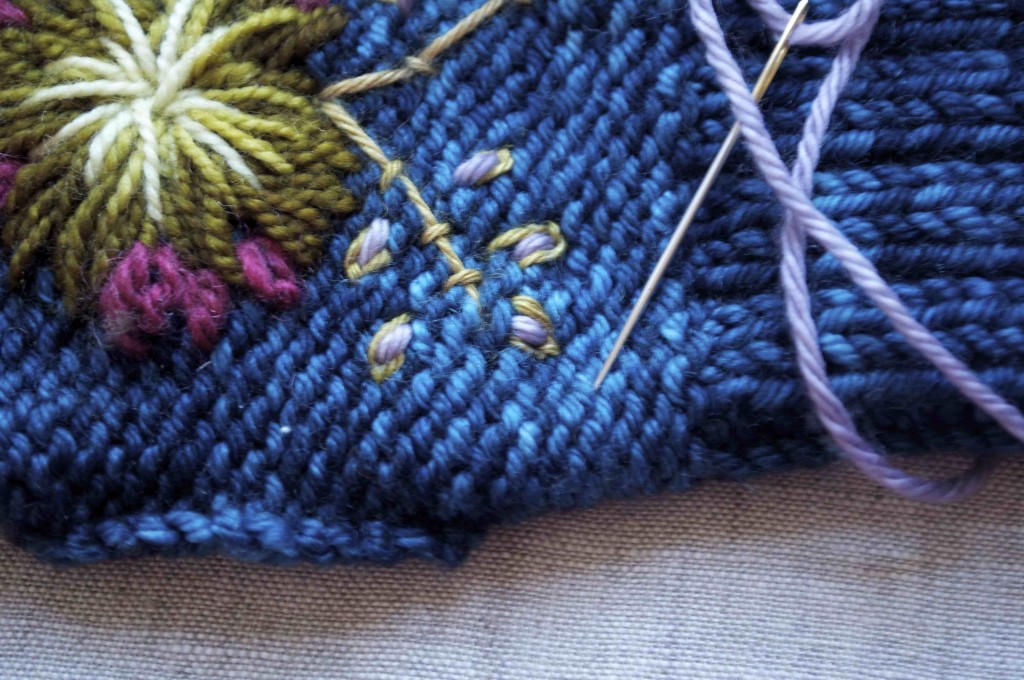
Fill the lazy daisy stitches with the single straight stitch in a contrasting colour to pick out the detail of the leaves. The final touch is to add little lazy daisy petals in a contrasting colour around the green central motif.
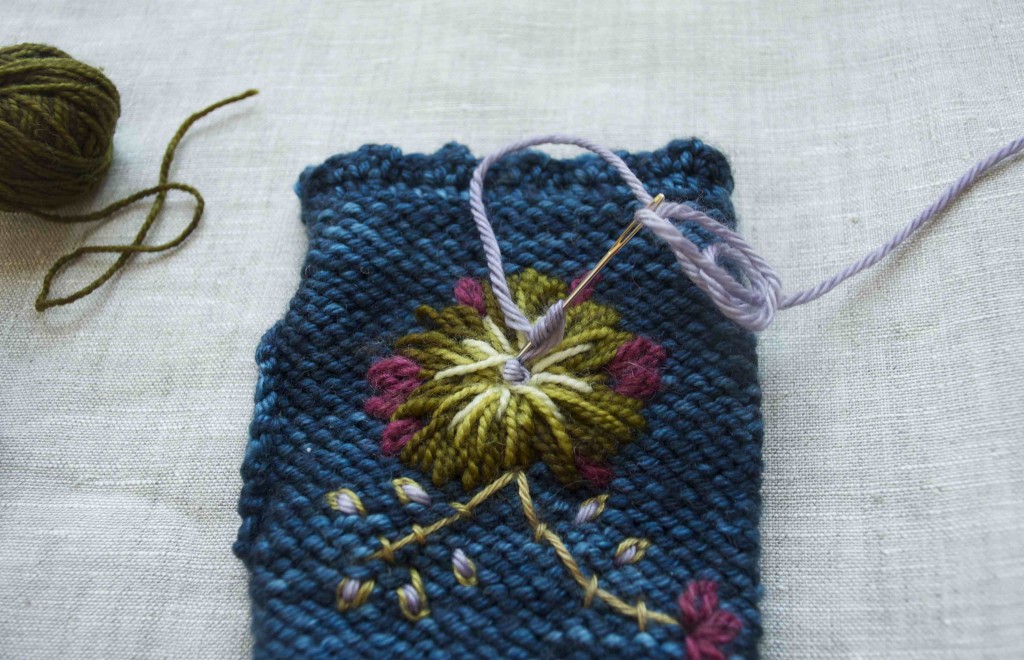
We also added some french knots to the centre of the design. Create these by winding the thread around the needle before you enter the fabric just next to where you came out. The thread will coil up to create a little knot detail.
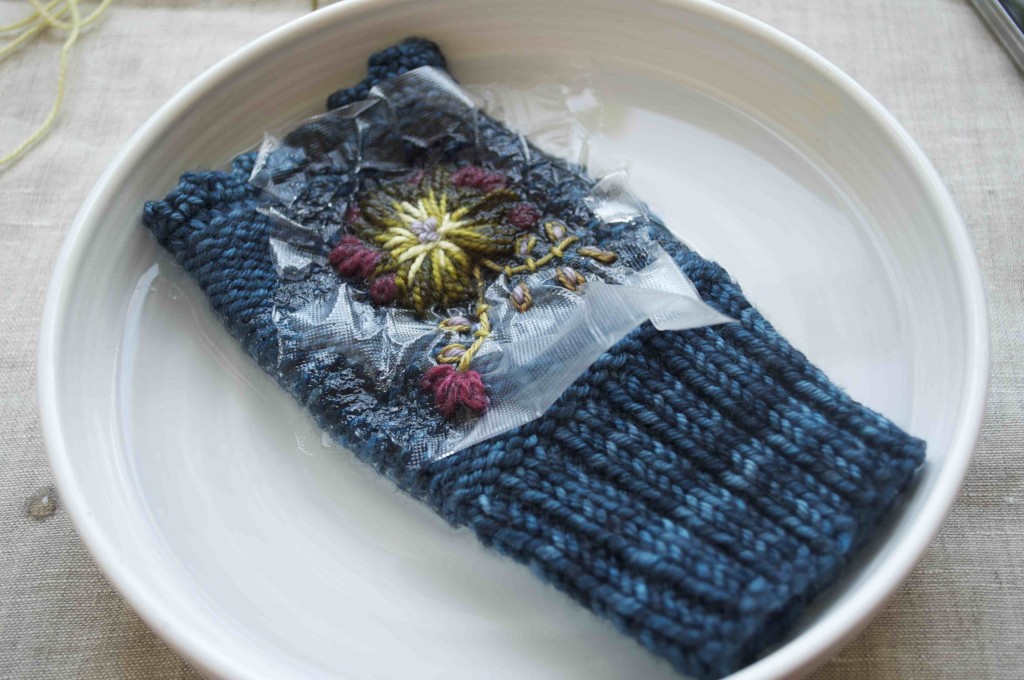
If you are using water-soluble embroidery film, pop the mitt in a bowl of water and the film will dissolve like magic! Leave to dry thoroughly.
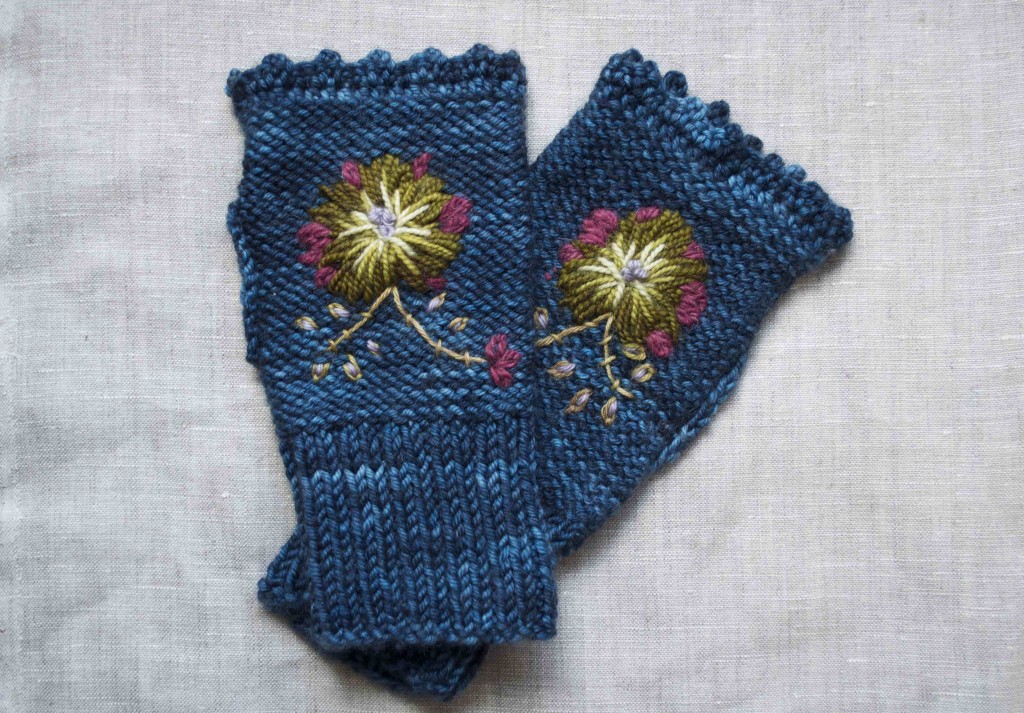
And there you have a pair of beautifully embroidered mitts. This tutorial and pattern are just a starting point , so experiment with different stitches and details. You might like to look to Tiff Fussell for inspiration on her Instagram account dottieangel and the back catalogue of her blog.
To kick start your next embroidery project we have one copy of Stitch Encyclopaedia:Embroidery up for grabs for one lucky reader. Simply comment below letting us know what other tutorials you’d like to see on the blog and we’ll draw a winner out of the woolly hat next week. Make sure you get your comments in before midnight GMT Wednesday 6th April as entries made after this time do not count.
Good luck and Happy Knitting, Crocheting and Embroidering!
Love these mittens. Must find time to make some.
I would love to see a tutorial on brioche knitting or an item on designing knitwear or crochet wear. I shall be trying to do some embroidery as I love the mittens in the book.
Such a great tutorial! Thank you for that!
I would love to see something on hand-sewing. I love hand-sewed things and you can take it with you like knitting without carrying the sewing machine. :))
How about some lacy shawls, I love to make these, gift them and use them myself.
Also, I have embroidered mittens before closing, and have made them on two pointed needles as one piece, not embroidered.
I’d love a tutorial about finishing off, especially sewing in ends in both knitting and crochet. I seem to leave bumps of yarn across my pieces as I am always worried it will unravel if I don’t go over and over the same spot.
I would second Brioche knitting. Thank you for the embroidery tips, those lovely mitts do not seem so daunting know.
I love the darning threads & mushrooms you stock & would enjoy a tutorial on darning. Love the mitts.
I would like to see hand sewing tutorials
What a great tutorial!
Inspired by your Instagram post on the granny square blocking kits (they seem like pure genius, by the way), I would love to see a tutorial on blocking and the different tools one can use.
I second the comment about tips for finishing garments. Sewing ends in and sewing up is the job I like the least.
Another thought would be about calculating stitches when substituting a yarn that has a different gauge. Can’t quite get my head around that!
Oh how I love these mitts……I’ve been dreaming of making these for a while now! Thanks for the tutorial, I would really love to win this book, as I have a very large and ambitious ‘woolly tattoo’ project waiting in the wings – inspired by the magnificent Dottieangel, of course! And I have no experience of embroidery so I’m a bit nervous about taking the plunge! As for the tutorial, I’d love to see a colour work tutorial – either on technique (colour dominance – please unravel this mystery!) or on how to put together a palette :)
Kate x
Provisional cast on baffles me- would love a clear tutorial.
Beautiful! I’d love to see embroidery on a cardigan.
I would like to see a tutorial on brioche. Thank you!
Love these gloves. Snow coming our way next week in PA so still too early to
Mitch ball the woollies!
This kind of tutorial is so great!
I would love to have your tips and tricks on weaving in ends on knitted on shawl borders, especially at the tips, and also on carrying yarn up the side of the work, especially on shawls and such, where the border will be quite noticeable. And if I may add another subject that I need some tips on is hand painted yarn that may bleed and which you would like to use with another contrasting color, how to deal with that (if there is a way).
xo Teresa
What a pleasure to see this tutorial based on Tif’s fabulous “tattoo” mitts. All the tips seem very clear!
As a left-handed knitter and crocheter, it could be fun to see a tutorial that addresses how we lefties make conversions from directions for right-handed folks. (It took me ages to figure out how to do the Kitchener stitch!)
Best wishes.
I would love to see a tutorial on blocking a newly knitted shawl. I know this enhances the lovely lace patterns but I’m not sure how to go about it!
I would be interested also in blocking a knitted shawl and also short rows. There seem to be a few different ways, but I think both would be very useful.
I would love to see different cast on methods being explained, and also another vote for brioche knitting.
I would like to see a tutorial of the ground breaking of your new store in Los Angeles. I need my Loop fix!
Now for a real answer… I think more embellishing ideas that add an extra bit… like beautiful edging?
I would love a mosaic knitting tutorial :-)
These mitts look so lovely with the embroidery and the tutorial is wonderful. The step-by-step photos were very helpful, and I love the tip about using cardboard inside. Thank you!
A tutorial on brioche knitting in 2 colours please – I have been planning to master it for some time and need a push!
A tutorial on embellishing knits with crochet would be great.
Love this! Hoe about a tut on that reverse mattress-stitch?
I would like to see a tutorial of the ground breaking of your new store in Los Angeles. I need my Loop fix! Now for a real answer… I think tutorials that show more embellishing techniques would be lovely… Like fancy edges?
Yeah brioche. But also how to deal with hand dyed wool mixing the skeins as recommended when you want to keep the edges tidy, and how best to use more than two skeins which don’t match too well. I hate being able to see tide marks!
I love this! I’d like to see a tutorial on colour knitting with lifted stitches. It’s so hard to get even.
Tutorials are very helpful. I would welcome a tutorial on either hand sewing or blocking. After going to so much trouble to knit something lovely I am afraid to block in case I ruin it.
I’d really love a tutorial on tiny knitted flowers and beautiful knitted edges too.
Hello Loop
I would appreciate a tutorial on Fair Isle knitting, especially how to weave in the second strand of colour
Thanks
Hello-yes, me too on the subject of Fair Isle. Thanks-enjoyed this tutorial.
Thank you so much for this tutorial – I’m a big fan of Tiff’s Woolly Tattooing! I would love to see a tutorial for double knitting, please – and I second brioche too. And fairisle…..I’m not asking for much am I?
This was lovely! I have a suede jacket that is torn at the elbow and this tutorial was really just what I needed! I’d love to see tutorials on shibori, hand-dyeing, steeking (ahhhhh! my worst nightmare) and maybe how to add a zip to your knitting project, in a neat way.
Lovely mittens! As a Norwegian I will give you a little info on “rosemaling”, which is a very old painting style in Norway. Here is from Wikipedia: https://en.wikipedia.org/wiki/Rosem%C3%A5ling with quite a few references. This is also good: http://www.rosemaling.org/styles.htm. And here you have some pictures of embroidery examples, for instance from Norwegian folk costumes. Lots of inspiration!
Sorry, I forgot the link to the pictures! Here it is: http://www.bing.com/images/search?q=rosemaling+broderi&qpvt=rosemaling+broderi&qpvt=rosemaling+broderi&FORM=IGRE.
I would love to see how you weave in ends- both in knitting and crochet.
Love the embroidery!
This was great! I’d love to see a tutorial on the brioche stitch, seems like it’s gaining popularity everywhere!
That was fabulous! I’ve done lots of cross stitch but not free hand embroidery. A great tutorial as many have mentioned would be brioche, but some different seaming techniques would be helpful too.
Thank you for this tutorial, I can’t wait to try this myself !
Maybe a tutorial on how to use the duplicate stitch would be helpful ?
Finishing techniques please as you can never get enough practise at these. So much time spend knitting I always tend to be a little impatient to get my garment on an weaving ends and blocking is always the final hurdle
I’d love to see a tutorial on double knitting. I have a pattern for a fabulous “Game of Thrones” scarf which I would love to make for my OH but don’t have the requisite skills.
I love these mittens and their embroidery . Thank you so much.
I will appreciate any tutorial, because I have so much to learn…
Have a good day!
Evelyne
I have wanted to try embroidery on knits ever since I first saw Tiff’s work. Love the stitching on these mitts as well as the mitts themselves.
I would also like to see a tutorial on darning.
I would love a tutorial on fair isle please. This one has really inspired me to give embroidery a go!
These are outstanding! I like all your tutorials, they are always an inspiration to try something new! So just go on surprising me!
thankyou for the embroidery tips-a great way to use up all those little balls left over from sock knitting!
A definite vote for a tutorial on Brioche- I don’t know how many times I tried, frogged, and tried again a pattern of Ysolda’s….in the end I threw it in the bin, as the yarn and my temper were completely frayed! I’ve never, ever done that before with any project.
xx
Love these crewel additions to things. I don’t know what tutorials I’d like to see. I just here for the pretty pictures :)
I would love a tutorial on fair isle and one on Brioche knitting. I love the embroidery tutorial and must make these beautiful fingerless mitts.
Thank you for this tutorial!
I would love to see a tutorial on weaving in ends in lacework. Perhaps also a tutorial comparing the various short-row techniques, on the RS and WS, to determine which work best for particular situations. I gather that some may be near invisible on the RS, but not on the WS, so they’re not ideal for shawls or scarves where the WS may show.
Nice, thank you! I’d love to see more about hand sewing and sewing knits.
What beautiful embroidery- love that we can embellish our knitting.
I would love to see a tutorial on duplicate stitch on knitting (to add a heart or animal to mittens, baby blanket or sweater).
I would love to see a tutorial on steering – something I haven’t yet dared to try.
Steeking!
Thanks for the gorgeous tutorial – I have a copy of the Loop 10 book and I was too scared to try this pattern before!
In the future maybe you can offer a tutorial on doing the crochet edge for the Islington shawl. (Or other crochet edges in general!) As a knitter I really love the shawl but the crochet intimidates me! Thanks again!!
Hello and greetings from Australia. Would love tute a on fair isle, crochet granny squares and blocking. Love the Tif pattern and embroidery tutorial.
I’d love a tutorial on how to design and knit a great tank for summer!
I’d love a tutorial on how to design and knit (or sew) a great tee for summer. Maybe based on your cup size!
What a clear and concise tutorial.As a teacher I don’t often come across tutorials that are understandable to all. Splendid !
These mittens by Tif are just delightful – what a great pattern and I love the colour and embroidery. I would like to see tutorials on crochet (beginners), fair-isle knitting and also blocking.
Lovely mittens!
I’d love to see a tutorial on good (stretchy?) cast off techniques that would work we’ll for shawls.
Great tuto !!!
Love to see tutos about 2 colors Brioche (incr/decr) & grafting.
Merci beaucoup.
I would love to see tutorials on simple cable and fair isle knitting. The embroidered mitts are beautiful
Thank you
Beautiful mitts. Would definitely love to see a steeking tutorial.
Fab tutorial like actually fab. There are loads of embroidery tutorials on the internet but this one is actually really clear and easy to follow. So thanks :) I’d like to see tutorials on knitting in the round using dpn’s & also circulars please. X
Wonderful tutorial!
Perfect timing for this post! Appreciating the time and effort you put into your website and in-depth information you offer. Such a great embroidery project. Worth sharing! Please do continue sharing updates! Thanks a lot!
Bonjour,
Les mitaines sont belles,quelle est la couleur utilisée?.
Thank you! The colour used was our exclusive colour for Loop called ‘turbillion’ in the Uncommon Thread Lush worsted
Happy knitting and embroidering!