
Loop pattern errata

Sorry folks! We hate that we have to post anything on this page, but if there are mistakes we will endeavour to correct them here.
Publications are listed chronologically with corrections in alphabetical order below. Check the front of your book to see whether you have a first or second edition.
Baby Cloud Cardigan, February 2024
Please note, the instructions for the button row on row 5 should read:
Row 5 (buttonhole row)(RS): [K to marker, M1r, SM, k1, SM, M1l] 4 times, k to last 4 sts ssk, yo, k2
Loop’s Mehlsen Geranium Scarf Kit Errata, October 2022
Geranium Scarf Kits sold in October 2022 were missing Chart F from the pattern. We apologise for the omission. Chart F can be found here: https://www.loopknitlounge.com/wp-content/uploads/2022/10/Loop-Geranium-Chart-F.pdf
Loop’s 10 Errata, Edition 1, published September 2015
Autumn Leaves by Paulina Popiolek
Page 116 – Mistake in Lace Border Chart
RS row in the written instructions begins with Sl1 pwise wyif, whereas if knitting from the chart, the corresponding symbol V is given as wyib. Either way will work (as long as you remain consistent throughout the pattern) but we suggest wyif.
Islington Shawl by Kirsten Kapur
Page 26 – Mistake in chart legend. In the book the symbol for knit is described incorrectly as:
RS: purl
WS: knit
and of course should be:
RS: knit
WS: purl
Wreath Shawl by Meghan Fernandes
Page 60 – Mistake in Chart A

Fifth symbol down of key (as shown above) should read as RS: K1tbl and WS : P1tbl. Written instructions are correct.
—
Juju’s Loops Errata, Edition 1, published January 2012
Please scroll down to see the correction for the second edition. Look at the front of your book to see which edition you have.
Berry Wrap

February 22, 2012
The symbol for increasing 3 in one stitch (shown below) should be read as (k,yo,k) in the same stitch, regardless of whether it is worked on the right-side or the wrong-side. The symbol key in the book says it should be read as (p,yo,p) on the WS. If you do work it as (p,yo,p) it won’t make much difference to the pattern.
Brown Eyed Susan
January 27, 2012
There is a mistake in the way the row numbers are counted for the main body of the shawl. Row 16 should be row 17, Row 32 should be row 33, and row 60 should be row 61.
Cinnamon Girl
February 9, 2012
Summary of errors:
- Page 74/75: Typo “Right Front Lace Cable Band”
- Mistake in order of when to slip marker and when to make a stitch under “Work in Pattern as follows:”
- Page 75: Typo “Row 54”
- The stitch counts at the end or rows 57 and 61 are incorrect and the instruction row 63 was missing from the large size, although the overall row count of 70, before separating for the sleeves, is correct.
- The stitch count included the 14 Back lace cable stitches in the sleeves rather than the back in the “Divide Sleeve Stitches and Try On” instructions. This led to an incorrect stitch count at the end of the “Continue Knitting Body section” as well as for the sleeves.
- Page 76: increase total underarm incorrect, should read 12 stitches rather than 18 for this version.
- Page 79: if you are completing the sleeve with twisted moss stitch, and working in the round, just follow row one of the moss stitch pattern, between the asterisk, for every row.
Here’s how it should read: (changes in red)
- Right Front Lace Cable band (pages 74 & 75)
Row 1 (RS): ktbl, ptbl, yo, sk2p, yo, ptbl, ktbl, k1
Row 2 (WS): sl wyif, k2 tbl, p3, ktbl, ptbl
Row 3: ktbl, ptbl, ssk, yo, k1, ptbl, ktbl, k1
Row 4: sl wyif, k2 tbl, p3, ktbl, ptbl
Row 5: ktbl, ptbl, k3, ptbl, ktbl, k1
Row 6: sl wyif, k2 tbl, p3, ktbl, ptbl - Work in pattern as follows:
Follow the chart (see below) or written instructions for the Left Front Lace-Cable Band for the first 8sts, slm, M1 if required, slm, work Lace-Cable Band, slm, M1 if required, work moss st over the sleeve,slm, M1 if required,M1 if required, slm,… - For sizes M&L only: (pages 75 & 76)
Row 51: M1 at each of the sleeve edge markers, but not at fronts. 8sts inc; (241, 249) sts
Row 55: M1 at each of sleeve edge markers, but not at fronts. 8sts inc; (249, 257) sts - For size L only: (page 76)
Row 57: Lg; Work incs at each of the sleeve edge markers, but not at fronts. 8sts inc’d; 257sts.
Row 61: Lg; Work incs at each of the sleeve edge markers, but not at fronts. 8sts inc’d; 265.
Row 63: Lg; Work incs at each of the sleeve edge markers, but not at fronts. 8sts inc’d; 273sts.
No more increases for size L, continue to work 273sts in pattern 7 more rows and then follow the instructions for separate sleeve stitches. - Divide Sleeve Stitches and Try On (page 76)
Run a length of scrap yarn through the 39 (42, 45) sts of the Left Front body. Place the 39 (45, 51) Left Sleeve stitches on a separate length of scrap yarn. Continue the scrap yarn from the front stitches around to pick up the 69 (75, 81) Back sts. Place the 39 (45, 51) Right Sleeve sts on a third length of scrap yarn separate yarn holder. Continue the scrap yarn from the back around to the remaining 39 (42, 45) sts of the Right Front body. Tie off the lengths of yarn holding the sleeve stitches (allowing an extra 4cm/1.5in of length on each), and try on…
Continue Knitting Body (page 76)
Pop your needle back through the Left Front, Back and Right Front stitches, leaving the sleeves on the lengths of scrap yarn. Knit the Left Front stitches in pattern, up to the armhole. Use a temporary co to add 9sts under the arm. Continue knitting the back in pattern to the right underarm. Again, using a provisional cast on, add 9sts and then continue knitting front in pattern, working the new underarm sts in moss st. 165 (177, 189) sts… - Set up stocking stitch panels as follows: (page 77)
Continue to follow the chart or written instructions for the Left Front Lace-Cable Band for the first 8sts, slm, (kfb, k1) 12 (12, 13 times), kfb, slm, [38 (38, 43) sts in section]
Continue to work Lace-Cable Band over the next 7sts, slm, (kfb, k1) 4 times, kfb, slm, [12sts in section]
Continue to work Lace-Cable Band over the next 7sts, slm, (kfb, k1) 26(30, 32) times, kfb, slm. [18sts in the this section]
Continue to work Lace-Cable Band ove rth enext 7sts, slm, (kfb, k1) 4 times, kfb, slm, [12sts in section]… - Twisted Moss Rib Written Instructions: (page 77)
When knitted in the round, for a cuff (as in the pea soup version) follow these instructions:
Row 1: *Ptbl, k1, ktbl, k1* Repeat across sleeve stitches.
Row 2: *Ptbl, p1, ktbl, p1*. Repeat across sleeve stitches.
Repeat these two rows for desired length.
Prairie Shawl
April 2, 2012
Instructions:
CO 246sts. Knit 5 rows, slipping the first stitch of every row with yarn in front. On the 6th row, s1wyif, k2, pm, *k16, pm*, rep * to * fourteen fifteen times, k3.
The next mistake occurs in the written instructions only:
Rw39: S1wyif, k2, ssk, k6, yo, k1, yo, k3 k2, sk2p, *K10, yo, k1, yo, k2, sk2p*, rep * to* ten more times, k14, k2tog, k3, 210sts.
Swoon
January 25th, 2012
There is a mistake in the number of rows knitted in Swoon. The pattern says that there are 60 rows knit before joining at the underarm, and 60 rows after the underarm for a total of 120 rows before beginning the double bobble edging. There are, in fact, 72 rows before and after the armhole, making a total of 144 rows before the double bobble edge is begun.
Here’s how it should read (changes in red):
- Back (page 55)
Using scrap yarn,CO 179sts with provisional cast on. Follow the 24 rows of chart or written instructions for Wrapped Stocking Stitch.
Repeat the 24 rows of Wrapped Stocking Stitch twice more andthen knit the first twelve rows of sequence again(72rows). You have arrived at the underarm. Put all back stitches on a holder and work fronts to the underarm. - Right Front (page 55)
Working on the right shoulder of the back (as it would be worn) pick up 74sts with the RS of fabric facing, so that your needle point comes out at right shoulder. Follow the chart or written instructions for Wrapped Stocking Stitch, Rows 1-24. Repeat the 24 rows of Wrapped Stocking Stitch twice more (72 rows). You have arrived at the underarm. Break yarn and put all right front stitches on hold. - Left Front (page 56)
Working on the left shoulder of the back (as it would be worn) pick up 74sts with the RS of fabric facing, so that your needle point comes out at neckline. Work Rows 13-24 of chart or written instructions for Wrapped Stocking Stitch. Repeat the 24 rows of the Wrapped Stocking Stitch twice more and then knit Rows 1-12 again (72 rows). You have arrived at the underarm. - Joining at the Underarm (page 56)
Beginning at the Left Front neckline, knit pattern Row 13 for 74sts. Cast on 3sts using backward loop method. Continuing in pattern, knit 179 Back sts. Cast on 3sts. Knit the final 74sts of Right Front in pattern. - Body instructions (page 56)
Resume pattern Rows 14 – 24, following Wrapped Stocking Stitch Chart or written instructions. Repeat the 24 rows of the wrapped Stocking Stitch written instructions or chart twice more and then repeat rows 1-12 again…
We found an error in the stitch repeat of the written instructions for the fronts on rows 7 and 19 of the pattern:
Right Front Written Instructions (page 56)
Rows 7 (RS): K4, *3sw, k11*, rep *to* four more times, 3sw, k4…
Row 19 (RS): K11, *3sw, k11*, rep *to* four three more times, 3sw, k4.
Left Front Written Instructions (page 56)
Rows 7 (RS): K4, *3sw, k11*, rep *to* four more times, 3sw, k4…
Row 19 (RS): K11, *3sw, k11*, rep *to* four three more times, 3sw, k4.
Juju’s Loop Errata, Edition 2, published July 2012
Cinnamon Girl
January 5, 2012
Some text went missing at the top of page 74.
Yoke set up, Next Row (page 74)
S1wyif, ktbl twice, p3, ktbl, ptbl, pm, p1, pm, *ptbl, ktbl, p3, ktbl, ptbl*, pm, (p1, k 1) four (five, six) times, p1, pm, rep *to*, pm (p1, k1) twelve (thirteen, fourteen) times, p1, pm, rep *to *, pm, (p1, k1), four (five, six) times, p1, pm, rep *to *, pm, p1, pm, ptbl, ktbl, p3, k2, tbl, k1. 10st markers; 89 (95, 101) sts
Vintage Crochet Errata, published November 2007
Picnic Blanket
The measurements for the fabric strips should be in centimetres, not millimetres ie. the pattern should read 2cm and 3cm fabric strips.
Maisie Cardigan
Yarn is DK-weight, not worsted as listed.
Millie Cardigan – US Version
Errata for Millie Cardigan from Vintage Crochet
Revised and Corrected Pattern, 3-10-08
Materials
Twelve (fourteen, fifteen, sixteen) 50g balls Debbie Bliss Cashmerino Aran, shade 012 Dusky Pink
4mm crochet hook
4.25mm crochet hook
Three strips of fabric, each approximately 115cm (11⁄4yds) long and 1.5cm (5⁄8in) wide
Tapestry needle
Stitch marker
Measurements
To fit four sizes: S (M, L, XL).
Bust measurement: 38 (40, 44, 48)in./ 97 (102, 112, 122)cm
Length: 17 (17, 171⁄2, 171⁄2)in./ 43 (43, 44, 44)cm
Sleeve length: 17 (17, 171⁄2, 171⁄2)in./ 43 (43, 44, 44)cm
Note
Instructions for larger sizes are given in parentheses. Where there is only one figure, it applies to all sizes.
Tension
16 sts and 19 rows = 10cm (4in) in body pattern stitch using a 4.25mm crochet hook.
Abbreviations
See page 120.
Yoke
Using smaller hook, ch 71.
Row 1 (RS): Dc in 4th ch from hook, dc in each ch across to end, turn (68 sts).
Row 2: Ch 3 (counts as first dc), (dc in next dc, 2 dc in next dc, dc in next dc) 22 times, dc in next dc, turn (90 sts).
Row 3: Ch 3, dc in each dc across to end, turn (90 sts).
Row 4: Ch 3, (1 dc in next dc, 2 dc in next dc, dc in next 2 dc) 22 times, dc in last dc, turn (112 sts).
Row 5: Repeat row 3 (112 sts).
Row 6: Ch 3, (dc in next 2 dc, 2 dc in next dc, dc in next 2 dc) 22 times, dc in next dc, turn (134 sts).
Row 7: Repeat row 3 (134 sts).
Row 8: Ch 3, (dc in next 3 dc, 2 dc in next dc, dc in next 2 dc) 22 times, dc in next dc, turn (156 sts).
Row 9: Repeat row 3 (156 sts).
DIVIDE YOKE (see below) for sizes S and M here, after completing Row 9.
Row 10: Ch 3, (dc in next 3 dc, 2 dc in next dc, dc in next 3 dc) 22 times (178 sts).
Row 11: Ch 3, dc in same st, dc in each st to last st, 2dc in last st, turn (180 sts).
DIVIDE YOKE (see below) for sizes X and XL here, after completing Row 11.
DIVIDE YOKE
For left front: Place marker at st 22 (22, 26, 26) from edge.
For left sleeve: Place marker at st 34 (34, 38, 38) from edge of left front (in other words, start counting from last st of left front, or at st 23 from edge).
For back: Place marker at st 44 (44, 52, 52) from edge of left sleeve.
For right sleeve: Place marker at st 34 (34, 38, 38) counted from edge of back piece.
For right front: You should have 22 (22, 26, 26) sts (including 1st ch-3, which counted as 1st dc).
Left front
Row 1: With larger hook, ch 1, miss first dc, 2 sc in next dc, (miss next dc,
2 sc in next dc) 10 (10, 12, 12) times more, sc again in last st (inc made), turn [23 (23, 27, 27) sts].
Row 2: Ch 1, 2 sc in 1st sc (inc made), (miss next dc, 2 sc in next sc) 11(11, 13, 13) times, turn [24 (24, 28, 28) sts].
Repeat rows 1–2 seven (8, 8, 10) times more [38 (40, 44, 48) sts].
Continue straight for 46 (46, 48, 48) rows more until left front measures 33 (34, 36, 37)cm/13 (131⁄2, 14, 141⁄2)in from bottom of yoke (not neckline).
Left sleeve
Row 1: With larger hook, attach yarn with sl st in next st over from edge of left front. Ch 1, sc in same dc as ch-1, 2 sc in next dc (inc made), (miss next dc, 2 sc in next dc) 16 (16, 18, 18) times, sc again in last dc (inc made), turn [36 (36, 40, 40) sts].
Row 2: Ch 1, 2 sc in first sc, (miss next sc, 2 sc in next sc) 17 (17, 19, 19) times, 2 sc in last sc, turn [38 (38, 42, 42) sts].
Repeat rows 1–2 seven (8, 8, 10) times more [66 (70, 74, 82) sts].
Continue straight for 46 (46, 48, 48) rows more until sleeve measures 33 (34, 36, 37)cm/13 (131⁄2, 14, 141⁄2)in from bottom of yoke (not neckline).
Back
Row 1: With larger hook, attach yarn with sl st in next st over from edge of left sleeve. Ch 1, sc in same dc as ch-1, 2 sc in next dc (inc made), (miss next dc, 2 sc in next dc) 21 (21, 25, 25) times, sc again in last sc (inc made), turn [46 (46, 54, 54) sts].
Row 2: Ch 1, 2 sc in first sc, (miss next sc, 2 sc in next dc) 22 (22, 26, 26) times, 2 sc in last sc, turn [48 (48, 56, 56) sts].
Repeat rows 1–2 seven (8, 8, 10) times more [76 (80, 88, 96) sts].
Continue straight for 46 (46, 48, 48) rows more until back measures 33 (34, 36, 37)cm/13 (131⁄2, 14, 141⁄2)in from bottom of yoke (not neckline).
Right sleeve
Row 1: With larger hook, attach yarn with sl st in next st over from edge of back. Work as for left sleeve.
Right Front
Row 1: With larger hook, attach yarn with sl st in next st over from edge of right sleeve. Work as for left front, reversing shaping.
To elaborate here, since some people have had trouble figuring out how to reverse the shaping:
Row 1: Ch 1, sc in 1st dc (inc made), 2 sc in next dc, (sk next dc, 2sc in next dc) 10 (10, 12, 12) times more; turn . 23 (23, 27, 27) sts.
Row 2: Ch 1, sk first sc, 2sc in next sc, (sk next sc, 2sc in next sc) 11 (11, 13, 13) times more (inc made); turn. 24 (24, 28, 28) sts.
Repeat rows 1 and 2 7 (8, 8, 10) more times. 38 (40, 44, 48) sts.
Finishing
Sew sleeves to fronts and back. Sew up sides, and then underarms. With RS facing, join yarn at left side seam. Sc in bottom loop of each sc across back and right front. Make 3 sc in last stitch of right front to turn corner. Sc evenly up right front and yoke, and in each loop of scs around neck opening. Make 3 sc in last stitch of neck to turn corner down yoke. Sc down edge of yoke and left front, making 3 sc around corner of left front, and continue across bottom of left front. Join with sl st into first sc. Fasten off.
Weave in all ends and block lightly (see page 137). Weave fabric strips through scs around yoke where comfortable, and tie in a bow to close.
Revised and Corrected Pattern, 3-10-08
Millie Cardigan UK Version – Errata
Materials
Twelve (fourteen, fifteen, sixteen) 50g balls Debbie Bliss Cashmerino Aran, shade 012 Dusky Pink
4mm crochet hook
4.25mm crochet hook
Three strips of fabric, each approximately 115cm (11⁄4yds) long and 1.5cm (5⁄8in) wide
Tapestry needle
Stitch marker
Measurements
To fit four sizes: S (M, L, XL).
Bust measurement: 97 (102, 112, 122)cm/38 (40, 44, 48)in.
Length: 43 (43, 44, 44)cm/17 (17, 171⁄2, 171⁄2)in.
Sleeve length: 43 (43, 44, 44)cm/17 (17, 171⁄2, 171⁄2)in.
Note
Instructions for larger sizes are given in parentheses. Where there is only one figure, it applies to all sizes.
Tension
16 sts and 19 rows = 10cm (4in) in body pattern stitch using a 4.25mm crochet hook.
Yoke
Using smaller hook, ch 71.
Row 1 (RS): Tr in 4th ch from hook, tr in each ch across to end, turn (68 sts).
Row 2: Ch 3 (counts as first tr), (tr in next tr, 2 tr in next tr, tr in next tr) 22 times, tr in next tr, turn (90 sts).
Row 3: Ch 3, tr in each tr across to end, turn (90 sts).
Row 4: Ch 3, (1 tr in next tr, 2 tr in next tr, tr in next 2 tr) 22 times, tr in last tr, turn (112 sts).
Row 5: Repeat row 3 (112 sts).
Row 6: Ch 3, (tr in next 2 tr, 2 tr in next tr, tr in next 2 tr) 22 times, tr in next tr, turn (134 sts).
Row 7: Repeat row 3 (134 sts).
Row 8: Ch 3, (tr in next 3 tr, 2 tr in next tr, tr in next 2 tr) 22 times, tr in next tr, turn (156 sts).
Row 9: Repeat row 3 (156 sts).
DIVIDE YOKE (see below) for sizes S and M here, after completing Row 9.
Row 10: Ch 3, (tr in next 3 tr, 2 tr in next tr, tr in next 3 tr) 22 times (178 sts).
Row 11: Ch 3, tr in same st, tr in each st to last st, 2tr in last st, turn (180 sts).
DIVIDE YOKE (see below) for sizes X and XL here, after completing Row 11.
DIVIDE YOKE
For left front: Place marker at st 22 (22, 26, 26) from edge.
For left sleeve: Place marker at st 34 (34, 38, 38) from edge of left front (in other words, start counting from last st of left front, or at st 23 from edge).
For back: Place marker at st 44 (44, 52, 52) from edge of left sleeve.
For right sleeve: Place marker at st 34 (34, 38, 38) counted from edge of back piece.
For right front: You should have 22 (22, 26, 26) sts (including 1st ch-3, which counted as 1st dc).
Left front
Row 1: With larger hook, ch 1, miss first tr, 2 dc in next tr, (miss next tr,
2 dc in next tr) 10 (10, 12, 12) times more, dc again in last st (inc made), turn [23 (23, 27, 27) sts].
Row 2: Ch 1, 2 dc in 1st dc (inc made), (miss next dc,
2 dc in next dc) 11(11, 13, 13) times, turn [24 (24, 28, 28) sts].
Repeat rows 1–2 seven (8, 8, 10) times more [38 (40, 44, 48) sts].
Continue straight for 46 (46, 48, 48) rows more until left front measures 33 (34, 36, 37)cm/13 (131⁄2, 14, 141⁄2)in from bottom of yoke (not neckline).
Left sleeve
Row 1: With larger hook, attach yarn with sl st in next st over from edge of left front. Ch 1, dc in same dc as ch-1, 2 dc in next dc (inc made), (miss next dc, 2 dc in next dc) 16 (16, 18, 18) times, dc again in last dc (inc made), turn [36 (36, 40, 40) sts].
Row 2: Ch 1, 2 dc in first dc, (miss next dc, 2 dc in next dc) 17 (17, 19, 19) times, 2 dc in last dc, turn [38 (38, 42, 42) sts].
Repeat rows 1–2 seven (8, 8, 10) times more [66 (70, 74, 82) sts].
Continue straight for 46 (46, 48, 48) rows more until sleeve measures 33 (34, 36, 37)cm/13 (131⁄2, 14, 141⁄2)in from bottom of yoke (not neckline).
Back
Row 1: With larger hook, attach yarn with sl st in next st over from edge of left sleeve. Ch 1, dc in same dc as ch-1, 2 dc in next dc (inc made), (miss next dc, 2 dc in next dc) 21 (21, 25, 25) times, dc again in last dc (inc made), turn [46 (46, 54, 54) sts].
Row 2: Ch 1, 2 dc in first dc, (miss next dc, 2 dc in next dc) 22 (22, 26, 26) times, 2 dc in last dc, turn [48 (48, 56, 56) sts].
Repeat rows 1–2 seven (8, 8, 10) times more [76 (80, 88, 96) sts].
Continue straight for 46 (46, 48, 48) rows more until back measures 33 (34, 36, 37)cm/13 (131⁄2, 14, 141⁄2)in from bottom of yoke (not neckline).
Right sleeve
Row 1: With larger hook, attach yarn with sl st in next st over from edge of back. Work as for left sleeve .
Right Front
Row 1: With larger hook, attach yarn with sl st in next st over from edge of right sleeve. Work as for left front, reversing shaping.
To elaborate here, since some people have had trouble figuring out how to reverse the shaping:
Row 1: Ch 1, dc in 1st tr (inc made), 2 dc in next tr, (sk next dc, 2dc in next dc) 10 (10, 12, 12) times more; turn . 23 (23, 27, 27) sts.
Row 2: Ch 1, sk first tr, 2dc in next tr, (sk next tr, 2dc in next tr) 11 (11, 13, 13) times more (inc made); turn. 24 (24, 28, 28) sts.
Repeat rows 1 and 2 7 (8, 8, 10) more times. 38 (40, 44, 48) sts.
Finishing
Sew sleeves to fronts and back. Sew up sides, and then underarms. With RS facing, join yarn at left side seam. Dc in bottom loop of each dc across back and right front. Make 3 dc in last stitch of right front to turn corner. Dc evenly up right front and yoke, and in each loop of trs around neck opening. Make 3 dc in last stitch of neck to turn corner down yoke. DC down edge of yoke and left front, making 3 dc around corner of left front, and continue across bottom of left front. Join with sl st into first dc. Fasten off.
Weave in all ends and block lightly (see page 137). Weave fabric strips through trs around yoke where comfortable, and tie in a bow to close.
Nico Shift Dress – Errata
2nd foundation row: 1 dc into 1st dc. *3dc in ch-sp, 1 dc. Repeat this across row (60 sts total).
7th round: 1 dc into 1st dc on next petal * 4 ch, 1 dc into 3rd ch from hook (picot made), twice, 1 ch, 1 dc into centre tr of same petal (picot lp made), ** 4 ch, 1 dc into 3rd ch from hook; repeat from **once, 1 ch, 1 dc into 1st dc on next petal; repeat from * omitting last dc and ending sl st into 1st dc.
Tea Cosy – Revised and Corrected Pattern, 3-10-08
Materials
For tea cosy
One 50g ball Blue Sky Alpacas Sportweight in each of the following shades: 514 Pale Aqua (Yarn A), 506 Natural Streaky Brown (Yarn B)
5mm crochet hook
Measurements
Tea cosy: 14cm (51⁄2in) deep; 20cm (8in) diameter at rim (fits average small teapot).
Cafetière cosy: 13cm (5in) deep; 30cm (12in) long (fits standard 1 litre or 6 cup cafetière).
Egg cosy: 6cm (21⁄2in) deep; 8cm (3in) diameter at bottom edge.
Tension
For tea cosy: 1 motif = 3cm (11⁄4in), using 5mm crochet hook.
For cafetière and egg cosies: 17 st = 10cm (4in), using 4.5mm hook.
Tea cosy
Using Yarn B and 5mm hook, make 32 ch.
Foundation row: 1 dc in 2nd ch from hook, 1 dc in each ch to end. 31 sts.
Change to Yarn A.
Row 1 (WS): 3 ch, * miss 3 sts, 3 tr in next st, (group made); rep from * to last 3 sts, miss 2 sts, 1 tr in last st.
Row 2: 1 ch, 1 dc in first st, 2 tr in next free st of 2 rows below (working round sts of previous row), * 1 dc in centre of group of 3 tr, 3 tr in centre of 3 free sts, of 2 rows below; rep from * ending 1 dc in centre tr of last group, 2 tr in centre of 3 free sts, 1 dc in top of 3 ch.
Row 3: Repeat row 1.
Row 4: Repeat row 2. These last 4 rows complete pattern.
Rows 5-13: Repeat 4 pattern rows twice more, then row 1 again.
Change to yarn B
Row 14: 1 ch, 1 dc in first st, 2 tr in next free st, * 1 dc in centre tr of next group, 2 tr in centre free st, rep from * to end, 1 dc in top of 3 ch.
Row 15: 3 ch, * miss 1 st, dec 1; rep from * ending 1 tr in last st.
Row 16: 3 ch, * dec 1; rep from * ending 1 tr in top of 3 ch. Fasten off.
Make another piece the same.
Join seams (see page 137), leaving openings for spout and handle.
Picot edge
Join in Yarn B and, working into loops from previous row, * 3 ch, 1 dc in first of these ch, miss 1 st, 1 dc in next st; rep from * to end. Fasten off.
Turn work to bottom edge and join in Yarn B, and work picot edge to match above. Fasten off.
Button loops
Using Yarn B work 3 button loops in ch, to the size appropriate for your chosen buttons. Stitch onto edge of cosy.
Using needle and thread, sew buttons along opposite edge to correspond with button loops.
Egg Cosy (Make 2 cosies in each of Yarns A, B and C)
Using Yarn A make 3 ch, join into ring with slip stitch.
Round 1: 6 dc into ring.
Round 2: (2 dc in each st) 6 times (12 sts).
Round 3: (1 dc in next st, 2 dc in next st) 6 times (18 sts).
Round 4: (1 dc in each of next 2 sts, 2 dc in next st) 6 times (24 sts).
Rounds 5–7: Work 5 rounds dc.
Round 8: Change to contrast Yarn D, * 3 ch, 1 dc in first of these ch, miss 1 st, 1 dc in next st; rep from * to end. Fasten off.
Repeat to make another cosy in Yarn A, then make 4 more cosies using Yarn B and Yarn C.
Using a needle and thread sew vintage button to top of cosy.
Syd Rabbit – Errata
there is a mistake on the feet:
UK terms:
Round 3: Ch 1, dc to centre st of 3-tr inc of previous round, 3dc into centre dc, rest of rnd ok, will end with (22 sts).
Round 4: will end with (32 sts).
Round 5: will end with (40 sts).
Butterfly Stitch Purse – Errata
Errata for Butterfly Stitch Purse from Vintage Crochet
Revised and Corrected Pattern, 3-10-08
Approximate measurements: 10cm (d) x 16cm (w)
Materials
Yarn: 1 ball Bel-Air
Colour: col. 3, deep plum
Crochet Hook size: 5mm
You will also need:
Lining fabric x 25cm wide (Bottle Green baby cord used)
Inner Lining fabric x 25 cm wide (Floral linen used)
*1 x modern silver purse frame (med)
*1 x Gutermann Textile Glue
*supplied by u-handbag.com
Using 5mm hook and 31sts make 2 shaped panels as follow:
1st Row: 3 ch., then work in tr. to end of row.
2nd Row: 3 ch., 1 tr., in 2nd tr., *miss 2 sts., 3 tr. in next st., miss 2sts., (1tr., 3ch., 1tr.) in next st.* repeat 5 times, miss 2 sts, 2tr
3rd Row: 3 ch., 2 tr. in 3 ch. space of previous row, *1 dc in 2nd of 3 tr. of previous row, 7 tr. in next 3 ch. space * repeat 4 times. 1dc in 2nd of 3 tr of previous row. 3 tr. in last 3 ch. space
4th Row: 3 ch., 1 tr. in first tr. , * 3 tr. in dc of previous row, (1 tr. , 3 ch., 1 tr.) in 4th tr. of group of 7tr. * repeat 4 times. 3tr into dc, dc in last st.
5th Row: 3ch 1 tr in 1st stitch. *1 dc in 2nd of 3 tr. of previous row, 7 tr. in next 3 ch. space * repeat 4 times. 1dc in 2nd of 3 tr, 3 tr. in last stitch
6th Row: 3 ch 1 tr in 1st tr. * 3 tr. in dc of previous row, (1 tr. , 3 ch., 1 tr.) in 4th tr. of group of 7. * repeat 4 times. 3tr in dc, dc in last st.
Decrease:
7th Row: dc into 3rd tr., * 7 tr. in 3 ch. space, 1dc in 2nd of 3 tr. of previous row* repeat 4 times 1 dcinto 2nd of 3 tr.
8th Row: 3 ch., *( 1tr., 3 ch., 1tr) into 4th of previous 7 tr., 3 tr. into dc * repeat 3 times. dc into 4th st. of previous group of 7tr.
9th Row: dc into 3 tr., * 7 tr. into 3 ch. space, 1dc in 2nd of 3 tr. of previous row* repeat 2 times, miss 1 st. dc.
10th Row: 3 ch., (1 tr., 3 ch., 1 tr.) into 4th of group of 7 tr., 3 tr. of dc, (1 tr., 3tr., 1 tr.) into 4th group of 7 tr. 3 tr into dc., miss 3 st dc. Fasten off.Make up instructions: unchanged
1st Row: 3 ch., then work in tr. to end of row.
2nd Row: 3 ch., 1 tr., in 2nd tr., *miss 2 sts., 3 tr. in next st., miss 2sts., (1tr., 3ch., 1tr.) in next st.* repeat 5 times, miss 2 sts, 2tr
3rd Row: 3 ch., 2 tr. in 3 ch. space of previous row, *1 dc in 2nd of 3 tr. of previous row, 7 tr. in next 3 ch. space * repeat 4 times. 1dc in 2nd of 3 tr of previous row. 3 tr. in last 3 ch. space
4th Row: 3 ch., 1 tr. in first tr. , * 3 tr. in dc of previous row, (1 tr. , 3 ch., 1 tr.) in 4th tr. of group of 7tr. * repeat 4 times. 3tr into dc, dc in last st.
5th Row: 3ch 1 tr in 1st stitch. *1 dc in 2nd of 3 tr. of previous row, 7 tr. in next 3 ch. space * repeat 4 times. 1dc in 2nd of 3 tr, 3 tr. in last stitch
6th Row: 3 ch 1 tr in 1st tr. * 3 tr. in dc of previous row, (1 tr. , 3 ch., 1 tr.) in 4th tr. of group of 7. * repeat 4 times. 3tr in dc, dc in last st.
Bobble Stitch Bag – Errata
there is an error in the pattern between the rows of bobble and cable. There should be a row as follows;
(working from front of fabric)
*1treble, miss 2 tr, 1 raised tr into next 2 tr then work 1 raised tr into the 1st and second tr missed (this forms the ‘mock cable effect’ 1 tr into the next tr 1 tr into the top of bobble repeat from* to the end
This row is repeated alternatively throughout the whole pattern
Lula Bobble Scarf – Errata
Bobble ends
Using Yarn A and 4.5mm hook, 8 ch, turn. Dc in each second st from hook to end. Turn (7 sts)
Row 1: no change (7sts)
Row 2: 1 ch, 6dc, 4dc in last st in row, turn (10 sts)
Row 3: no change (10sts)
Row 4: 1ch, 3dc in first st, 9dc, 3dc in last st, turn (15sts)
Row 5: no change (15sts)
Row 6: 1ch, 3dc in first st, 13dc, 2dc in last st, turn. (18sts)
Row 7: no change (18sts)
Row 8: 1ch, 2dc in first st, 16dc, 3dc in last st, turn. (21sts)
Row 9: no change (21sts)
Row 10: 1ch, 3dc in first st, 19dc, 2dc in last st, turn (24sts)
Row 11: no change (24sts)
Row 12: 1ch, 24dc, turn
Row 13: no change (24sts)
Neck Middle
Change to yarn B.
Row 1: 2ch, htr in next loop, *miss 2 loops, 1cl in 3rd loop*, repeat 6 more times. Miss 1 loop, 2htr in last loop. Turn.
Row 2: 2 ch, 1cl in each of the next 8 spaces, 2 htr into last loop of row.
Turn. Rows 3-8: Repeat last row, ending each with a half-cluster (2htr) into the last space.
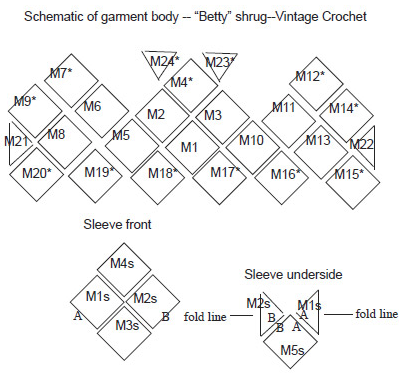
Betty Shrug – Errata ( schematic)
Thank you miss Juju. xxx
Re Swoon … Oh dear! I am just at the joining on of the lace edgings (both sleeves done, long neck edging in progress) and I wondered why the sleeve edgings gathered so much! It’ll block out a good bit, but I think this is going to be a present for my granddaughter – I can’t bear to frog the entire project.
Cora, I’m so sorry! You can try just reknitting the sleeves so they are two repeats less. This will make them fit the slightly shortened armholes, which are still plenty big!
Let me know if I can help with more specific details.
Oh, my….just got my book and I LOVE swoon. I am just learning charts, so thrilled that you have the row by row, too. But my first question is…. what is 3sw?? Did I miss it somewhere?
Glad you like it! I noticed the 3sw symbol was missing from the back flap but the explanation for it is on the front flap.
hello
I have 2 questions regarding swoon
1. can you please write me that how can i make the 3sw more snug. mine looks looser in compare to the 3sw on swoon picture.
2. for provisional cast on did you use the crochet method or two needles.
thanks much
Hi,
To make the 3sw snugger, pull the yarn more tightly around the stitches. Usually the problem is the other way, with people pulling the yarn too tightly.
The provisional cast on I use looks like this. I am currently making a video of myself doing it, which should be loaded up to the blog in a couple of weeks.
HOpe that helps.
Juju
Berry Wrap
Please can you advise regarding the berry stitch chart. I am referring to rows 16 and 20 where there is a symbol which represents inc3- RS(k,yo,k) WS(p,yo,p). The written directions advise to do k,yo,k on WS rows. Which is correct?
Sorry about that. It seems there was a mistake in the symbols at the back of the book. The symbol should read the same for both front and back, (k,yo,k). To be honest, it wouldn’t matter much though if you were to knit it (p,yo,p). I will make a note in the pattern errata. Thanks for pointing it out.
Juju
Hi,
I’m at the point in Swoon where I am knitting the Double Bobble Edge. In the instructions for Row 6 you refer to some tips on picking up the stitches from Row One and purling together with the stitches on the needles being on the blog.
I’ve had a search on the blog but can’t find it. Is it here yet and, if it is, can you give me a link?
Ta.
Hi,
I’m just making a video to support this now. I didn’t get it done before the book was published. So, that is why you can’t find it. I will be knitting one in a few days time and will take photos of the technique and put them on the blog to help. I’m using a different yarn this time that is a little more difficult than the Priairie used orginally. I will be putting in a lifeline at the first row to be picked up. I recommend doing that.
Juju
I’m writing with respect to the brown-eyed susan shawl. I’ve already finished knitting two of these shawls (the small version) and I’ve had no bother with the written instructions. The shawls have turned out perfectly. Perhaps the errors you mention concern the chart (which I can’t use I’m afraid). In any case, I’m very happy with my shawls and am next going to knit the large version. May I say I love all your patterns but am a bit apprehensive about being CAPABLE of following the instructions. Regards.
juju
i am knitting the right front of the swoon, and the 74 stiches does not work numberwise with the wrapped stich
pattern starting with row 7. i think the number of stiches for the left front does not work either. please let me know if this is an error.
I don’t think there is an error here. If you’d like to tell me exactly what your problem is I can try to help.
juju
Hi, me too, after you have 3sw they are on the left needle do you then knit these, making 14 k (11plus the 3sw) or just slip them back to rh needle? Thanks
I’m also having the same problem as Freba.
When I come to the 74 stitches of right front (with rs facing and needle coming out of right shoulder) the first set of 3ws on row 7 is k4, but the corresponding set on the back is also 4 knit stitches in.
Surely they should alternate.
I can see this will happen on the left front instructions too.
Waited four days for a response to this, but had to get on with it. I chose to keep in pattern (alternating wraps) rather than have corresponding wrapped stitches which would have looked wrong.
Now I find that the front and back are out of sync.
This is either a very badly written pattern, or there is more errata. Why aren’t these patterns properly tested before final print run? Most frustrating and disappointing!
Sorry, I’ve been away, but back now. Are you working from the first or second edition of the book. If you are working from the first edition follow the errata to correct the pattern after armhole. Staying in pattern will work.
Hi
Did you use all of the 2 skeins? I am substituting and wonder just how much total yarn I will need.
Thanks!
oops, that question was about “Swoon” sorry..
I’m knitting the small Brown Eyed Susan but I would like it to be a bit bigger but not as big as the large. Can I just increase enough sts to add an extra 2 pleat repeats (or 4) I can’t see any reason why not but there might be something I haven’t thought of!
Thanking you in advance for your reply
Yes you can. Are you the one who is talking to Liz about this variation?
Hellow – I love the Brown Eyed Susan Shawl but am unsure what the k1w means/is – can you refer me to a book or website for more explanation? Did finish the shawl and love it – want to make another but blundered through the k1w. Thanks Jackie
The description of K1w in the front of the book reads:
You are making three yarn overs in place of one knit stitch. They don’t look like much on that row. The next row they the outside yo get knit together with the stitches on either side, stretching the centre stitch open.
Hope that helps. I will be making a video to support this soon.
juju
Hi Juju,
I made a big mistake in row 22. I’m so sad! Now I found this message from you from years ago but I still don’t know what I have to do with the centre yarn over in the next row?
Do I have to knit it or let it slip from the needle?? Did you make the video in the meantime you mention in your reply and where can I find it?
Thank you very much.
Yours desperate Christine :(
Hi Christine, I don’t know, which pattern you are referring to.
Hi,
it was the Brown-eyed-susan pattern.
but all is okay .. found the explanation on ravelry.
Kind regards,
Christine
Good!
Hello, I just noticed a minor error on Row 39 of the Prairie Shawl’s written instructions. The first K3 should be K2. The chart is correct, however.
PS I LOVE this shawl.
You’re right! Thanks. I’m off to correct that now.
Thanks for letting me know.
juju
The stitch counts on the Prairie Shawl are not adding up correctly, unless of course, I am counting incorrectly. The CO is 246. Row 6 is slwyif, k2, pm, *k16, pm* rep * to * 14 times, k3.
16 X 14 = 224 plus 3 at the beginning and 3 at the end = 230.
Please help.
Sorry, there is a mistake. It should say:
Juju
Hi,
Congratulations for this wonderful book and these great patterns! With another French girl, we have chosen to knit “Swoon”. But we have a question about “3sw”. After having wraped 3 times the 3 stiches, do we have to knit them ou do we have just to slip them on the right needle and knit the 11 following stiches?
Thank you very much for your answer!
You could treat them either way but I slipped them and didn’t knit until the next row.
Juju
Hi,
I think I’ve found another error in Cinnamon Girl. On page 74 under the paragraph ‘Work in pattern as follows’ shouldn’t the make one be before slipping the marker on the sixth line?
I wrote it out because I was getting confused and it’s the only time when you’re directed to make one in the same section as the lace cable band.
Many thanks and congratulations on a beautiful book – I love it.
Felicity
Felicity,
You’re right! Thanks for pointing this out. We are just sorting out all the mistakes for our reprint so this is very helpful!
Juju
Hi Juju,
Luckily I have just begun Swoon…in time to make the corrections. I just hate to mark up your BEAUTIFUL book. I have copied the pages and made the corrections there…..I guess eventually I will have to change the book….ir perhaps just print out the errata and insert it. Any suggestions??
susann
We love, love, love the layering shrug. Any pattern for it?
Never mind. I just found it! Thank you
Hi there,
Another couple of questions for you about Cinnamon Girl:
1. Where it says ‘No more increases for size M’ your directed to make 12 more rows, but shouldn’t it be an odd number as in for the S and L sizes? Also because you have to start from the left front panel but this leaves you finishing on the right.
2. At the end of the paragraph ‘Continue knitting the body’ I have 195 stitches, which minus the provisional ones makes 177. Does the 177 include or exclude the 18 provisionally cast on stitches? I hope so otherwise I’ve got 18 extra stitches from somewhere!
Thanks,
Felicity
Ignore my second question – some severe mis-counting had been taking place!
Felicity
Hi
I’m knitting Brown-eyed Susan and I’m getting stuck with row 16/17. In order to get to 33 stitches I have knitted 16 rows. Row 17 is a WS row so row 18 is the RS row with the 16sts increase. I have taken RS rows as being even rows. Am I counting right?
Odd Rows are right side rows as in most patterns.
Thank you for making errata so easily found. I own the book and am on Ravelry and I found it first online, then saw the page in the book. Glad it was in both places. Love the book and that darling doll!!
On row 6 of the Prarie Shawl, what is pm? I can’t find the explanation anywhere. Many thanks.
pm means place marker.
Hi! I just started Cinnamon Girl (love it), and I’m confused by the increase section. When it says in Row 3 (and others) to M1 at each of the sleeve edge markers, but not at fronts, wouldn’t that mean you’d be increasing by 4 sts, not 8? Even if you’re to increase at the back edges too, that would only raise it to 6 sts increased across the whole row. Since the lace cable bands count as parts of the front and back and not the sleeves, there are only 4 markers at the sleeves. Or am I missing something?
Thanks!
Sarah
Hi Sarah,
re: your comment on 12 July 2012. I bought Juju’s Loops a year ago and have begun Cinnamon Girl and have the same question as you regarding the increases on pg 75 viz:
rows 3,5,7, M1 at each of sleeve markers, not sleeves
which as you state, means an increase of 4 sts per roe, not 8 as stated in the pattern .
Was this resolved ? I dont want to continue until I’m sure of this ! thanks
Where is the pattern for the layering shrug on page 92.
I thought in the second edition it would finally be included.
Why show something that is not available took it ????
Marcile
I have just finished the body of the Swoon shawl and am ready to begin to sew on the lace trim. I still have live stitches on the back neck and can’t find any directions for what to do with them. Did I miss a direction?
The back neck live stitches get grafted to the lace collar.
I am a little confused – are there patterns in this book for the layering shrug and the crow waltz shawl? They are in the table of contents, listed just like all the other items that have patterns, but I only find photos. I have the second edition.
Thanks.
Catherine
I’m working on the Berry Wrap and have started the main “berry” pattern, but the first tie end looks nothing like the pictures in the book. The directions had me increase, then create a pleat and then increase again until the start of the berry pattern. I assume the first half of the tie end will actually be the facing? But then I don’t have the m1, k2, m1 pattern going all the way through…the pleat is on the right side which I don’t see at all in the photos. Did I mis-read the directions? Great patterns BTW!
Thanks.
Cinnamon Girl question: on page 74 in the “next row ws” paragraph should there be a repeat of the p1, k1 group on the opposite end of the large moss stitch area?
Help, am really enjoying knitting the Brown Eyed Susan shawl, but have come unstuck on the written petal pleat instructions on row 24 , I think that the repeat might be p15 k7 , not as it says p15 k5 . The chart seems to indicate p15 k7, is this correct ?
With thanks Stacey
Silly me I wasn’t looking at the shaded area for the repeat on the chart,
Could you please tell me how much of each color of yarn I would need for the 3-colored version of a large Brown Eyed Susan wrap? I have been unable to figure it out. Thank you.
I have knitted wrist warmers in rows 56 to 60 I think there is something wrong about the amount of sts.is that wright?
Regards
Birgit
I just purchased the 2nd edition of this book, but these errata are too confusing. Is there a straightforward list of errors?
The way the complaints are listed here make it impossible to tell which edition people are referring to. The issues listed under “2nd Edition” don’t match my second edition book.
For example, the thread about row 39 on page 22 that mentions a K3 that should be a k2.Where is that? What are you talking about?
Please clear this area. I can’t be the only person confused by this stream. I’m also a bit surprised that the 2nd edition still has errors. Considering the price of this book, I would hope your publisher uses a competent editor.
Hi.I am knitting Elk in the woods,how can 21 stitches and 2 yo be 24 ,is there something I miss.
Regards Birgit
Bertie: can’t be correct that indentation in the trousers stops at 16th row. The trousers themselves are only 16 rows of stocking stitch, plus the one garter ridge. Either the trousers are meant to be knit longer, or the indentation guide number is wrong. Can you advise? Thx.
Ok – am I the only one confused by the pop spots lace section ?
Got to end of small – 381 st. – says to CO 7 – now have 388 st.
next row K6, K1st with border TBL – down to 387
First question: pattern states : then work lace edge patter 63 x – but the stitch pattern is an initial repeat using 7 stitches – so I don’t have enough stitches – only for about 55+ repeats. Why is my thinking wrong ?
Second question: work lace edge pattern a total of 63 x until you have 1 shawl st remaining on the needle. Do you mean at the end of each row (so 386 st for the pattern and one remaining st at the end ? Does that get K ? ), or do you mean at the very last repeat of row 12, there will be one stitch remaining
Third question: top of next page under “note” says border worked in garter st. There’s a border to the lace section ? and how many stitches at each end ? (I never had a border in garter stitch, even in the beginning)
Fourth question: row 2 of lace edging: states K1TBL with next shawl st. Yo, K2, K1TBL, K2, YO, K2tog — would be using the first 7 st — and then the K1TBL with the next shawl st. would be using the 8th st of the lace pattern repeat KNIT together WITH (?) the first stitch of the next group of 8 — you make 9 stitches – but you are moving into the next lace repeat. Is that correct ?
sorry! for so many questions
Hope they make sense
cak
PRAIRIE SHAWL (2nd Edition of JuJu’s Loops): in Chart F, Row 129, there is a misprint in the written instructions, which do not include SSK after working the first 3 stitches at the beginning of the row. The chart looks correct.
Lovely pattern! It’s been a joy to knit! It will be an even greater joy to wear!!
Thank you for such a wonderful pattern book!!
Happy Knitting!
i am trying the brown-eyed susan and am stymied at row 21 and totally frustrated. I can get the right count but the lace pattern is not properly aligned with the previous pattern – it is off by 2-3 stitches. had anyone had this problem?
Ava Wrap,Vintage Crochet 2nd Ed.
Row 5
…ch5,place 1 dtr in each of next dtr, ch1…
Any advice on how many of the next dtr this refers to, as it stands this would mean a row of
6 dtr across (3dtr 3ch 3dtr), ch1 and then a further 1dtr in each of next 3dtr.
But these next 3dtr are an incredible 10cm approx away from the ch1 which precedes them!
This book is currently retailing at £20, using the recommended yarn or similar costs another £30+ to purchase. This is becoming a very expensive disappointment.
Please don’t further my disappointment by not responding Loop.
Dear Stevie,
Many apologies for the delay in getting back to you about this query. We’ve had a look at the pattern and I think it’s supposed to read “in each of next 3 dtr”, as it does in the beginning of the row. This then makes the repeat from the * symmetrical. Does that solve the problem? If so, please do let us know and we will make sure it is added to the errata page. It’s very strange that it hasn’t been caught before, so thank you very much for bringing it to our attention – we are so sorry for the frustration.
If you still find that there’s a problem then please do let me know and we will take another look!
This is a scary amount of errata, I’m afraid to knit anything from the book I bought!
POPSPOTS
hOW DO YOU PICK UP THE STRANDS OF THE DROPPED STITCHES..
PLEASE EXPLAIN IN DETAIL!
THANKS
I GET IT UP TO DROPPING THE STITCH DOWN TO MC. I DO NOT UNDERSTAND HOW YOU CATCH THE STRANDS OF THE DROPPED STITCH AT THE SAME TIME AS DOING THE K, YO, K INTO THE STITCH YOU PICK UP.
THANKS FOR YOUR HELP!
SARVANI
Dear Sarvani
Have a look at this photo tutorial for some top pop spot tips! – https://www.loopknitlounge.com/pop-spots-tutorial/
Hope that helps!
Loop x
On March 30, 2014 Barb M found the errata I’ve just come across (Prairie Shawl row 129…should read S1wyif, k2, ssk, k15…) Perhaps putting this missed ssk in the listed errata of the 2nd edition would be helpful. I looked there before knitting to be sure I would have no issues. It was only after I figured out the pattern was missing an ssk that I looked in everyone’s comments below the errata section to be sure I was not duplicating someone else’s comment. Which I guess I am…
Is there an erroe in the Mignon pattern row 15 there are not enough sts-end of row- “last 10 sts Cb4 p2 k4. I’ve started the project 3 times and hit a wall at row 15, HELP
Hi Janet,
Sorry to hear you are having problems with the pattern. We’ve just checked the maths of the pattern and there are no errors. On Row 14 you should have 136 stitches, so I’d make sure that you are at that stitch count before starting Row 15.
Hope that helps! Let us know if you have any other problems.
Loop x
I am having the same problem with row 15. I have 136 on row 14 to start. Assumption- the c4b requires a total of 8 stitches. Correct? There appears to be a 6 stitch border on each end? So 136- 12= 124 stitches excluding the border. The asterisk portion requires a 14 stitch repeat. I do the 6 stitch border, then 14/14/14/14/14/14/14/14 (112), so I have done 118 stitches total at this point. If I do another asterisk repeat of 14 that leaves me only with 4 stitches to complete. How do I get to the last 10 stitches without breaking up the asterisk portion, the math does not add up? Please explain, as I have 136 stitches.
Hi Sarah, thank you for your comment. Please send us an email to shop@loopknitting.com and we’ll try and take a look at this for you.
Loop x
I am knitting Brown Eyed Susan. I would like to know which method is used for
The t2l in the pattern?
It’s such a beautiful pattern and I would love to finish it. I would appreciate hearing
From you.
Did you see the key on the back flap of the book? t2l; twist 2 left; cross 1sts stitch in front over 2nd stitch, purl stitch in back, knit through the back loop of stitch in front. I hope that clarifies it for you.
Your beautiful child’s cardigan Hygge seems to have an error. the pattern section using CB4 CF4 comes after the instructions to decrease for the yoke. But in the picture it shows it below joining all the pieces for the yoke, but I can’t an errata for it. I have all the pieces ready and am itching to get it finished!!
Hi Donna,
We haven’t had any reported errata for this design yet – it is possible you are thinking the yoke is longer than it looks? If you look closely the cable starts right underneath the arm.
Hope that helps – any other queries please email us at shop@loopknitting.com
Loop x
That’s OK. I’ve been a knitting pattern tester for Paton’s Wools (Main Australian knitting company) so I worked it out and amended myself. I just thought you would want to know for anyone else who wanted to knit it. Its a beautiful little cardigan. Thanks for the reply.
Glad you sorted it in the end. Happy knitting :)
Loop x
Re: Swoon
I am knitting the sweater now and have run into difficulty with the errata. I have the January 2012 version and I found this errata. It was all going well until I hit the left front. The wrapped stitches don’t alternate if I start with row 13. If I do the alternating wrapped sts keeping up with the already established pattern, it won’t match at the underarm. There will be too many sts for the wrapped pattern to work when I join the body. Can anyone help? Does the later published versions fix this issue?
I have finished the shawl & have difficulty crocheting.
Can you tell me how to cast off in knit?
Many thanks!
Dianne
Hi, would anyone please advise how to do the 3sw on Swoon pattern?
Saw the note to look on front cover of book but can’t see it on my version.
Hi Sue,
Please send us an email to shop@loopknitting.com and we will do our best to help you out. Alternatively, you could also look on the pattern page on Ravelry, where others may have come across the same thing.
Ellinor
I would like to knit blink with ITO but am useless at choosing a two complimentary colours – and your kits have all sold out!!
I have already knit the pop pink and it is gorgeous.
Any suggestions for greens. yellows or blues would be great
I am having trouble with the Mabel pattern. I do not see how to make the increases in rows 9, 15 and 21.
Hi Donna, if you’re struggling with this pattern, please email us on shop@loopknitting.com and we can help you out! Thanks!
I am knitting Mabel – a child’s cardigan and I am having difficulty with trow 21 where I should have an increase of 38 stitches for a total of 165. However, if I follow the directions as given, I will end up with more than 200.
Can someone please explain to me how I can do the 5 stitches together – 3 times – and not increase each group by 2 stitches.
Thank you
Hi Leah, we have a tutorial for the cluster stitch that Mabel uses on our ‘tutorials’ page here. If you are still having trouble please email us at shop@loopknitting.com, it will be much easier for us to help you that way. Thanks!
Hi. I’m also having a problem with row21. I’m ending up with too many stitches. Could you explain the row please. I should end up with 133 stitches and am way over this. I’ve pulled my knitting back twice but can’t get to the correct number of stitches. Thank you.
Hello Sara,
Have you watched our Cluster Stitch Tutorial? You can find it here: https://www.youtube.com/watch?v=CUouArCTWog
If that doesn’t help, please email shop@loopknitting.com or feel free to stop by one of our Knitting SOS sessions: https://loopknitting.com/products/knitting-sos?_pos=1&_sid=fef7c1ae9&_ss=r
Hope that helps!
Oleander Shawl – what is the stitch count at the end of row 5. I double checked my knitting against the pattern and its correct, but I’m getting a stitch count of 98. Row 4 ended in 99 stitches. I can’t figure out how I lost a stitch.
Hi Jenny, if you could please email shop@loopknitting.com we will be able to help you with your query there. Thank you!
The “OTSO” pattern. Bears worked in the round.
Work chest shaping as follows:
Round 7: contains extra stitches – S/B 44sts.
The above row (#7) contains too many stitch instructions. Using the number of instructions, the way the row is written, would end with 60 sts. rather than 44.
With the chest, round 7 adjusted, the “bear” turned out really well! I give my knitted animals to our local hospital and they will be greatly appreciated.
In the book, Vintage Crochet, the Bobble Stitch Bag pattern seems to be missing a return row. Repeating row 4 doesn’t seem to work for me. Your help is greatly appreciated.
Hello! if you could please email shop@loopknitting.com we will be able to help you with your query there. Thank you!
I am not finding any comment here about the Pop Shots Shawl. Row 37 says stitch count is 667. The previous section -row 36-ends at a stitch count of 441. That would be an increase of 226 stitches over 6 rows, lol.