Loop pattern errata
Sorry folks! We hate that we have to post anything on this page, but if there are mistakes we will endeavour to correct them here.
Publications are listed chronologically with corrections in alphabetical order below. Check the front of your book to see whether you have a first or second edition.
Baby Cloud Cardigan, February 2024
Please note, the instructions for the button row on row 5 should read:
Row 5 (buttonhole row)(RS): [K to marker, M1r, SM, k1, SM, M1l] 4 times, k to last 4 sts ssk, yo, k2
Loop’s Mehlsen Geranium Scarf Kit Errata, October 2022
Geranium Scarf Kits sold in October 2022 were missing Chart F from the pattern. We apologise for the omission. Chart F can be found here: https://www.loopknitlounge.com/wp-content/uploads/2022/10/Loop-Geranium-Chart-F.pdf
Loop’s 10 Errata, Edition 1, published September 2015
Autumn Leaves by Paulina Popiolek
Page 116 – Mistake in Lace Border Chart
RS row in the written instructions begins with Sl1 pwise wyif, whereas if knitting from the chart, the corresponding symbol V is given as wyib. Either way will work (as long as you remain consistent throughout the pattern) but we suggest wyif.
Islington Shawl by Kirsten Kapur
Page 26 – Mistake in chart legend. In the book the symbol for knit is described incorrectly as:
RS: purl
WS: knit
and of course should be:
RS: knit
WS: purl
Wreath Shawl by Meghan Fernandes
Page 60 – Mistake in Chart A

Fifth symbol down of key (as shown above) should read as RS: K1tbl and WS : P1tbl. Written instructions are correct.
—
Juju’s Loops Errata, Edition 1, published January 2012
Please scroll down to see the correction for the second edition. Look at the front of your book to see which edition you have.
Berry Wrap

February 22, 2012
The symbol for increasing 3 in one stitch (shown below) should be read as (k,yo,k) in the same stitch, regardless of whether it is worked on the right-side or the wrong-side. The symbol key in the book says it should be read as (p,yo,p) on the WS. If you do work it as (p,yo,p) it won’t make much difference to the pattern.
Brown Eyed Susan
January 27, 2012
There is a mistake in the way the row numbers are counted for the main body of the shawl. Row 16 should be row 17, Row 32 should be row 33, and row 60 should be row 61.
Cinnamon Girl
February 9, 2012
Summary of errors:
- Page 74/75: Typo “Right Front Lace Cable Band”
- Mistake in order of when to slip marker and when to make a stitch under “Work in Pattern as follows:”
- Page 75: Typo “Row 54”
- The stitch counts at the end or rows 57 and 61 are incorrect and the instruction row 63 was missing from the large size, although the overall row count of 70, before separating for the sleeves, is correct.
- The stitch count included the 14 Back lace cable stitches in the sleeves rather than the back in the “Divide Sleeve Stitches and Try On” instructions. This led to an incorrect stitch count at the end of the “Continue Knitting Body section” as well as for the sleeves.
- Page 76: increase total underarm incorrect, should read 12 stitches rather than 18 for this version.
- Page 79: if you are completing the sleeve with twisted moss stitch, and working in the round, just follow row one of the moss stitch pattern, between the asterisk, for every row.
Here’s how it should read: (changes in red)
- Right Front Lace Cable band (pages 74 & 75)
Row 1 (RS): ktbl, ptbl, yo, sk2p, yo, ptbl, ktbl, k1
Row 2 (WS): sl wyif, k2 tbl, p3, ktbl, ptbl
Row 3: ktbl, ptbl, ssk, yo, k1, ptbl, ktbl, k1
Row 4: sl wyif, k2 tbl, p3, ktbl, ptbl
Row 5: ktbl, ptbl, k3, ptbl, ktbl, k1
Row 6: sl wyif, k2 tbl, p3, ktbl, ptbl - Work in pattern as follows:
Follow the chart (see below) or written instructions for the Left Front Lace-Cable Band for the first 8sts, slm, M1 if required, slm, work Lace-Cable Band, slm, M1 if required, work moss st over the sleeve,slm, M1 if required,M1 if required, slm,… - For sizes M&L only: (pages 75 & 76)
Row 51: M1 at each of the sleeve edge markers, but not at fronts. 8sts inc; (241, 249) sts
Row 55: M1 at each of sleeve edge markers, but not at fronts. 8sts inc; (249, 257) sts - For size L only: (page 76)
Row 57: Lg; Work incs at each of the sleeve edge markers, but not at fronts. 8sts inc’d; 257sts.
Row 61: Lg; Work incs at each of the sleeve edge markers, but not at fronts. 8sts inc’d; 265.
Row 63: Lg; Work incs at each of the sleeve edge markers, but not at fronts. 8sts inc’d; 273sts.
No more increases for size L, continue to work 273sts in pattern 7 more rows and then follow the instructions for separate sleeve stitches. - Divide Sleeve Stitches and Try On (page 76)
Run a length of scrap yarn through the 39 (42, 45) sts of the Left Front body. Place the 39 (45, 51) Left Sleeve stitches on a separate length of scrap yarn. Continue the scrap yarn from the front stitches around to pick up the 69 (75, 81) Back sts. Place the 39 (45, 51) Right Sleeve sts on a third length of scrap yarn separate yarn holder. Continue the scrap yarn from the back around to the remaining 39 (42, 45) sts of the Right Front body. Tie off the lengths of yarn holding the sleeve stitches (allowing an extra 4cm/1.5in of length on each), and try on…
Continue Knitting Body (page 76)
Pop your needle back through the Left Front, Back and Right Front stitches, leaving the sleeves on the lengths of scrap yarn. Knit the Left Front stitches in pattern, up to the armhole. Use a temporary co to add 9sts under the arm. Continue knitting the back in pattern to the right underarm. Again, using a provisional cast on, add 9sts and then continue knitting front in pattern, working the new underarm sts in moss st. 165 (177, 189) sts… - Set up stocking stitch panels as follows: (page 77)
Continue to follow the chart or written instructions for the Left Front Lace-Cable Band for the first 8sts, slm, (kfb, k1) 12 (12, 13 times), kfb, slm, [38 (38, 43) sts in section]
Continue to work Lace-Cable Band over the next 7sts, slm, (kfb, k1) 4 times, kfb, slm, [12sts in section]
Continue to work Lace-Cable Band over the next 7sts, slm, (kfb, k1) 26(30, 32) times, kfb, slm. [18sts in the this section]
Continue to work Lace-Cable Band ove rth enext 7sts, slm, (kfb, k1) 4 times, kfb, slm, [12sts in section]… - Twisted Moss Rib Written Instructions: (page 77)
When knitted in the round, for a cuff (as in the pea soup version) follow these instructions:
Row 1: *Ptbl, k1, ktbl, k1* Repeat across sleeve stitches.
Row 2: *Ptbl, p1, ktbl, p1*. Repeat across sleeve stitches.
Repeat these two rows for desired length.
Prairie Shawl
April 2, 2012
Instructions:
CO 246sts. Knit 5 rows, slipping the first stitch of every row with yarn in front. On the 6th row, s1wyif, k2, pm, *k16, pm*, rep * to * fourteen fifteen times, k3.
The next mistake occurs in the written instructions only:
Rw39: S1wyif, k2, ssk, k6, yo, k1, yo, k3 k2, sk2p, *K10, yo, k1, yo, k2, sk2p*, rep * to* ten more times, k14, k2tog, k3, 210sts.
Swoon
January 25th, 2012
There is a mistake in the number of rows knitted in Swoon. The pattern says that there are 60 rows knit before joining at the underarm, and 60 rows after the underarm for a total of 120 rows before beginning the double bobble edging. There are, in fact, 72 rows before and after the armhole, making a total of 144 rows before the double bobble edge is begun.
Here’s how it should read (changes in red):
- Back (page 55)
Using scrap yarn,CO 179sts with provisional cast on. Follow the 24 rows of chart or written instructions for Wrapped Stocking Stitch.
Repeat the 24 rows of Wrapped Stocking Stitch twice more andthen knit the first twelve rows of sequence again(72rows). You have arrived at the underarm. Put all back stitches on a holder and work fronts to the underarm. - Right Front (page 55)
Working on the right shoulder of the back (as it would be worn) pick up 74sts with the RS of fabric facing, so that your needle point comes out at right shoulder. Follow the chart or written instructions for Wrapped Stocking Stitch, Rows 1-24. Repeat the 24 rows of Wrapped Stocking Stitch twice more (72 rows). You have arrived at the underarm. Break yarn and put all right front stitches on hold. - Left Front (page 56)
Working on the left shoulder of the back (as it would be worn) pick up 74sts with the RS of fabric facing, so that your needle point comes out at neckline. Work Rows 13-24 of chart or written instructions for Wrapped Stocking Stitch. Repeat the 24 rows of the Wrapped Stocking Stitch twice more and then knit Rows 1-12 again (72 rows). You have arrived at the underarm. - Joining at the Underarm (page 56)
Beginning at the Left Front neckline, knit pattern Row 13 for 74sts. Cast on 3sts using backward loop method. Continuing in pattern, knit 179 Back sts. Cast on 3sts. Knit the final 74sts of Right Front in pattern. - Body instructions (page 56)
Resume pattern Rows 14 – 24, following Wrapped Stocking Stitch Chart or written instructions. Repeat the 24 rows of the wrapped Stocking Stitch written instructions or chart twice more and then repeat rows 1-12 again…
We found an error in the stitch repeat of the written instructions for the fronts on rows 7 and 19 of the pattern:
Right Front Written Instructions (page 56)
Rows 7 (RS): K4, *3sw, k11*, rep *to* four more times, 3sw, k4…
Row 19 (RS): K11, *3sw, k11*, rep *to* four three more times, 3sw, k4.
Left Front Written Instructions (page 56)
Rows 7 (RS): K4, *3sw, k11*, rep *to* four more times, 3sw, k4…
Row 19 (RS): K11, *3sw, k11*, rep *to* four three more times, 3sw, k4.
Juju’s Loop Errata, Edition 2, published July 2012
Cinnamon Girl
January 5, 2012
Some text went missing at the top of page 74.
Yoke set up, Next Row (page 74)
S1wyif, ktbl twice, p3, ktbl, ptbl, pm, p1, pm, *ptbl, ktbl, p3, ktbl, ptbl*, pm, (p1, k 1) four (five, six) times, p1, pm, rep *to*, pm (p1, k1) twelve (thirteen, fourteen) times, p1, pm, rep *to *, pm, (p1, k1), four (five, six) times, p1, pm, rep *to *, pm, p1, pm, ptbl, ktbl, p3, k2, tbl, k1. 10st markers; 89 (95, 101) sts
Vintage Crochet Errata, published November 2007
Picnic Blanket
The measurements for the fabric strips should be in centimetres, not millimetres ie. the pattern should read 2cm and 3cm fabric strips.
Maisie Cardigan
Yarn is DK-weight, not worsted as listed.
Millie Cardigan – US Version
Errata for Millie Cardigan from Vintage Crochet
Revised and Corrected Pattern, 3-10-08
Materials
Twelve (fourteen, fifteen, sixteen) 50g balls Debbie Bliss Cashmerino Aran, shade 012 Dusky Pink
4mm crochet hook
4.25mm crochet hook
Three strips of fabric, each approximately 115cm (11⁄4yds) long and 1.5cm (5⁄8in) wide
Tapestry needle
Stitch marker
Measurements
To fit four sizes: S (M, L, XL).
Bust measurement: 38 (40, 44, 48)in./ 97 (102, 112, 122)cm
Length: 17 (17, 171⁄2, 171⁄2)in./ 43 (43, 44, 44)cm
Sleeve length: 17 (17, 171⁄2, 171⁄2)in./ 43 (43, 44, 44)cm
Note
Instructions for larger sizes are given in parentheses. Where there is only one figure, it applies to all sizes.
Tension
16 sts and 19 rows = 10cm (4in) in body pattern stitch using a 4.25mm crochet hook.
Abbreviations
See page 120.
Yoke
Using smaller hook, ch 71.
Row 1 (RS): Dc in 4th ch from hook, dc in each ch across to end, turn (68 sts).
Row 2: Ch 3 (counts as first dc), (dc in next dc, 2 dc in next dc, dc in next dc) 22 times, dc in next dc, turn (90 sts).
Row 3: Ch 3, dc in each dc across to end, turn (90 sts).
Row 4: Ch 3, (1 dc in next dc, 2 dc in next dc, dc in next 2 dc) 22 times, dc in last dc, turn (112 sts).
Row 5: Repeat row 3 (112 sts).
Row 6: Ch 3, (dc in next 2 dc, 2 dc in next dc, dc in next 2 dc) 22 times, dc in next dc, turn (134 sts).
Row 7: Repeat row 3 (134 sts).
Row 8: Ch 3, (dc in next 3 dc, 2 dc in next dc, dc in next 2 dc) 22 times, dc in next dc, turn (156 sts).
Row 9: Repeat row 3 (156 sts).
DIVIDE YOKE (see below) for sizes S and M here, after completing Row 9.
Row 10: Ch 3, (dc in next 3 dc, 2 dc in next dc, dc in next 3 dc) 22 times (178 sts).
Row 11: Ch 3, dc in same st, dc in each st to last st, 2dc in last st, turn (180 sts).
DIVIDE YOKE (see below) for sizes X and XL here, after completing Row 11.
DIVIDE YOKE
For left front: Place marker at st 22 (22, 26, 26) from edge.
For left sleeve: Place marker at st 34 (34, 38, 38) from edge of left front (in other words, start counting from last st of left front, or at st 23 from edge).
For back: Place marker at st 44 (44, 52, 52) from edge of left sleeve.
For right sleeve: Place marker at st 34 (34, 38, 38) counted from edge of back piece.
For right front: You should have 22 (22, 26, 26) sts (including 1st ch-3, which counted as 1st dc).
Left front
Row 1: With larger hook, ch 1, miss first dc, 2 sc in next dc, (miss next dc,
2 sc in next dc) 10 (10, 12, 12) times more, sc again in last st (inc made), turn [23 (23, 27, 27) sts].
Row 2: Ch 1, 2 sc in 1st sc (inc made), (miss next dc, 2 sc in next sc) 11(11, 13, 13) times, turn [24 (24, 28, 28) sts].
Repeat rows 1–2 seven (8, 8, 10) times more [38 (40, 44, 48) sts].
Continue straight for 46 (46, 48, 48) rows more until left front measures 33 (34, 36, 37)cm/13 (131⁄2, 14, 141⁄2)in from bottom of yoke (not neckline).
Left sleeve
Row 1: With larger hook, attach yarn with sl st in next st over from edge of left front. Ch 1, sc in same dc as ch-1, 2 sc in next dc (inc made), (miss next dc, 2 sc in next dc) 16 (16, 18, 18) times, sc again in last dc (inc made), turn [36 (36, 40, 40) sts].
Row 2: Ch 1, 2 sc in first sc, (miss next sc, 2 sc in next sc) 17 (17, 19, 19) times, 2 sc in last sc, turn [38 (38, 42, 42) sts].
Repeat rows 1–2 seven (8, 8, 10) times more [66 (70, 74, 82) sts].
Continue straight for 46 (46, 48, 48) rows more until sleeve measures 33 (34, 36, 37)cm/13 (131⁄2, 14, 141⁄2)in from bottom of yoke (not neckline).
Back
Row 1: With larger hook, attach yarn with sl st in next st over from edge of left sleeve. Ch 1, sc in same dc as ch-1, 2 sc in next dc (inc made), (miss next dc, 2 sc in next dc) 21 (21, 25, 25) times, sc again in last sc (inc made), turn [46 (46, 54, 54) sts].
Row 2: Ch 1, 2 sc in first sc, (miss next sc, 2 sc in next dc) 22 (22, 26, 26) times, 2 sc in last sc, turn [48 (48, 56, 56) sts].
Repeat rows 1–2 seven (8, 8, 10) times more [76 (80, 88, 96) sts].
Continue straight for 46 (46, 48, 48) rows more until back measures 33 (34, 36, 37)cm/13 (131⁄2, 14, 141⁄2)in from bottom of yoke (not neckline).
Right sleeve
Row 1: With larger hook, attach yarn with sl st in next st over from edge of back. Work as for left sleeve.
Right Front
Row 1: With larger hook, attach yarn with sl st in next st over from edge of right sleeve. Work as for left front, reversing shaping.
To elaborate here, since some people have had trouble figuring out how to reverse the shaping:
Row 1: Ch 1, sc in 1st dc (inc made), 2 sc in next dc, (sk next dc, 2sc in next dc) 10 (10, 12, 12) times more; turn . 23 (23, 27, 27) sts.
Row 2: Ch 1, sk first sc, 2sc in next sc, (sk next sc, 2sc in next sc) 11 (11, 13, 13) times more (inc made); turn. 24 (24, 28, 28) sts.
Repeat rows 1 and 2 7 (8, 8, 10) more times. 38 (40, 44, 48) sts.
Finishing
Sew sleeves to fronts and back. Sew up sides, and then underarms. With RS facing, join yarn at left side seam. Sc in bottom loop of each sc across back and right front. Make 3 sc in last stitch of right front to turn corner. Sc evenly up right front and yoke, and in each loop of scs around neck opening. Make 3 sc in last stitch of neck to turn corner down yoke. Sc down edge of yoke and left front, making 3 sc around corner of left front, and continue across bottom of left front. Join with sl st into first sc. Fasten off.
Weave in all ends and block lightly (see page 137). Weave fabric strips through scs around yoke where comfortable, and tie in a bow to close.
Revised and Corrected Pattern, 3-10-08
Millie Cardigan UK Version – Errata
Materials
Twelve (fourteen, fifteen, sixteen) 50g balls Debbie Bliss Cashmerino Aran, shade 012 Dusky Pink
4mm crochet hook
4.25mm crochet hook
Three strips of fabric, each approximately 115cm (11⁄4yds) long and 1.5cm (5⁄8in) wide
Tapestry needle
Stitch marker
Measurements
To fit four sizes: S (M, L, XL).
Bust measurement: 97 (102, 112, 122)cm/38 (40, 44, 48)in.
Length: 43 (43, 44, 44)cm/17 (17, 171⁄2, 171⁄2)in.
Sleeve length: 43 (43, 44, 44)cm/17 (17, 171⁄2, 171⁄2)in.
Note
Instructions for larger sizes are given in parentheses. Where there is only one figure, it applies to all sizes.
Tension
16 sts and 19 rows = 10cm (4in) in body pattern stitch using a 4.25mm crochet hook.
Yoke
Using smaller hook, ch 71.
Row 1 (RS): Tr in 4th ch from hook, tr in each ch across to end, turn (68 sts).
Row 2: Ch 3 (counts as first tr), (tr in next tr, 2 tr in next tr, tr in next tr) 22 times, tr in next tr, turn (90 sts).
Row 3: Ch 3, tr in each tr across to end, turn (90 sts).
Row 4: Ch 3, (1 tr in next tr, 2 tr in next tr, tr in next 2 tr) 22 times, tr in last tr, turn (112 sts).
Row 5: Repeat row 3 (112 sts).
Row 6: Ch 3, (tr in next 2 tr, 2 tr in next tr, tr in next 2 tr) 22 times, tr in next tr, turn (134 sts).
Row 7: Repeat row 3 (134 sts).
Row 8: Ch 3, (tr in next 3 tr, 2 tr in next tr, tr in next 2 tr) 22 times, tr in next tr, turn (156 sts).
Row 9: Repeat row 3 (156 sts).
DIVIDE YOKE (see below) for sizes S and M here, after completing Row 9.
Row 10: Ch 3, (tr in next 3 tr, 2 tr in next tr, tr in next 3 tr) 22 times (178 sts).
Row 11: Ch 3, tr in same st, tr in each st to last st, 2tr in last st, turn (180 sts).
DIVIDE YOKE (see below) for sizes X and XL here, after completing Row 11.
DIVIDE YOKE
For left front: Place marker at st 22 (22, 26, 26) from edge.
For left sleeve: Place marker at st 34 (34, 38, 38) from edge of left front (in other words, start counting from last st of left front, or at st 23 from edge).
For back: Place marker at st 44 (44, 52, 52) from edge of left sleeve.
For right sleeve: Place marker at st 34 (34, 38, 38) counted from edge of back piece.
For right front: You should have 22 (22, 26, 26) sts (including 1st ch-3, which counted as 1st dc).
Left front
Row 1: With larger hook, ch 1, miss first tr, 2 dc in next tr, (miss next tr,
2 dc in next tr) 10 (10, 12, 12) times more, dc again in last st (inc made), turn [23 (23, 27, 27) sts].
Row 2: Ch 1, 2 dc in 1st dc (inc made), (miss next dc,
2 dc in next dc) 11(11, 13, 13) times, turn [24 (24, 28, 28) sts].
Repeat rows 1–2 seven (8, 8, 10) times more [38 (40, 44, 48) sts].
Continue straight for 46 (46, 48, 48) rows more until left front measures 33 (34, 36, 37)cm/13 (131⁄2, 14, 141⁄2)in from bottom of yoke (not neckline).
Left sleeve
Row 1: With larger hook, attach yarn with sl st in next st over from edge of left front. Ch 1, dc in same dc as ch-1, 2 dc in next dc (inc made), (miss next dc, 2 dc in next dc) 16 (16, 18, 18) times, dc again in last dc (inc made), turn [36 (36, 40, 40) sts].
Row 2: Ch 1, 2 dc in first dc, (miss next dc, 2 dc in next dc) 17 (17, 19, 19) times, 2 dc in last dc, turn [38 (38, 42, 42) sts].
Repeat rows 1–2 seven (8, 8, 10) times more [66 (70, 74, 82) sts].
Continue straight for 46 (46, 48, 48) rows more until sleeve measures 33 (34, 36, 37)cm/13 (131⁄2, 14, 141⁄2)in from bottom of yoke (not neckline).
Back
Row 1: With larger hook, attach yarn with sl st in next st over from edge of left sleeve. Ch 1, dc in same dc as ch-1, 2 dc in next dc (inc made), (miss next dc, 2 dc in next dc) 21 (21, 25, 25) times, dc again in last dc (inc made), turn [46 (46, 54, 54) sts].
Row 2: Ch 1, 2 dc in first dc, (miss next dc, 2 dc in next dc) 22 (22, 26, 26) times, 2 dc in last dc, turn [48 (48, 56, 56) sts].
Repeat rows 1–2 seven (8, 8, 10) times more [76 (80, 88, 96) sts].
Continue straight for 46 (46, 48, 48) rows more until back measures 33 (34, 36, 37)cm/13 (131⁄2, 14, 141⁄2)in from bottom of yoke (not neckline).
Right sleeve
Row 1: With larger hook, attach yarn with sl st in next st over from edge of back. Work as for left sleeve .
Right Front
Row 1: With larger hook, attach yarn with sl st in next st over from edge of right sleeve. Work as for left front, reversing shaping.
To elaborate here, since some people have had trouble figuring out how to reverse the shaping:
Row 1: Ch 1, dc in 1st tr (inc made), 2 dc in next tr, (sk next dc, 2dc in next dc) 10 (10, 12, 12) times more; turn . 23 (23, 27, 27) sts.
Row 2: Ch 1, sk first tr, 2dc in next tr, (sk next tr, 2dc in next tr) 11 (11, 13, 13) times more (inc made); turn. 24 (24, 28, 28) sts.
Repeat rows 1 and 2 7 (8, 8, 10) more times. 38 (40, 44, 48) sts.
Finishing
Sew sleeves to fronts and back. Sew up sides, and then underarms. With RS facing, join yarn at left side seam. Dc in bottom loop of each dc across back and right front. Make 3 dc in last stitch of right front to turn corner. Dc evenly up right front and yoke, and in each loop of trs around neck opening. Make 3 dc in last stitch of neck to turn corner down yoke. DC down edge of yoke and left front, making 3 dc around corner of left front, and continue across bottom of left front. Join with sl st into first dc. Fasten off.
Weave in all ends and block lightly (see page 137). Weave fabric strips through trs around yoke where comfortable, and tie in a bow to close.
Nico Shift Dress – Errata
2nd foundation row: 1 dc into 1st dc. *3dc in ch-sp, 1 dc. Repeat this across row (60 sts total).
7th round: 1 dc into 1st dc on next petal * 4 ch, 1 dc into 3rd ch from hook (picot made), twice, 1 ch, 1 dc into centre tr of same petal (picot lp made), ** 4 ch, 1 dc into 3rd ch from hook; repeat from **once, 1 ch, 1 dc into 1st dc on next petal; repeat from * omitting last dc and ending sl st into 1st dc.
Tea Cosy – Revised and Corrected Pattern, 3-10-08
Materials
For tea cosy
One 50g ball Blue Sky Alpacas Sportweight in each of the following shades: 514 Pale Aqua (Yarn A), 506 Natural Streaky Brown (Yarn B)
5mm crochet hook
Measurements
Tea cosy: 14cm (51⁄2in) deep; 20cm (8in) diameter at rim (fits average small teapot).
Cafetière cosy: 13cm (5in) deep; 30cm (12in) long (fits standard 1 litre or 6 cup cafetière).
Egg cosy: 6cm (21⁄2in) deep; 8cm (3in) diameter at bottom edge.
Tension
For tea cosy: 1 motif = 3cm (11⁄4in), using 5mm crochet hook.
For cafetière and egg cosies: 17 st = 10cm (4in), using 4.5mm hook.
Tea cosy
Using Yarn B and 5mm hook, make 32 ch.
Foundation row: 1 dc in 2nd ch from hook, 1 dc in each ch to end. 31 sts.
Change to Yarn A.
Row 1 (WS): 3 ch, * miss 3 sts, 3 tr in next st, (group made); rep from * to last 3 sts, miss 2 sts, 1 tr in last st.
Row 2: 1 ch, 1 dc in first st, 2 tr in next free st of 2 rows below (working round sts of previous row), * 1 dc in centre of group of 3 tr, 3 tr in centre of 3 free sts, of 2 rows below; rep from * ending 1 dc in centre tr of last group, 2 tr in centre of 3 free sts, 1 dc in top of 3 ch.
Row 3: Repeat row 1.
Row 4: Repeat row 2. These last 4 rows complete pattern.
Rows 5-13: Repeat 4 pattern rows twice more, then row 1 again.
Change to yarn B
Row 14: 1 ch, 1 dc in first st, 2 tr in next free st, * 1 dc in centre tr of next group, 2 tr in centre free st, rep from * to end, 1 dc in top of 3 ch.
Row 15: 3 ch, * miss 1 st, dec 1; rep from * ending 1 tr in last st.
Row 16: 3 ch, * dec 1; rep from * ending 1 tr in top of 3 ch. Fasten off.
Make another piece the same.
Join seams (see page 137), leaving openings for spout and handle.
Picot edge
Join in Yarn B and, working into loops from previous row, * 3 ch, 1 dc in first of these ch, miss 1 st, 1 dc in next st; rep from * to end. Fasten off.
Turn work to bottom edge and join in Yarn B, and work picot edge to match above. Fasten off.
Button loops
Using Yarn B work 3 button loops in ch, to the size appropriate for your chosen buttons. Stitch onto edge of cosy.
Using needle and thread, sew buttons along opposite edge to correspond with button loops.
Egg Cosy (Make 2 cosies in each of Yarns A, B and C)
Using Yarn A make 3 ch, join into ring with slip stitch.
Round 1: 6 dc into ring.
Round 2: (2 dc in each st) 6 times (12 sts).
Round 3: (1 dc in next st, 2 dc in next st) 6 times (18 sts).
Round 4: (1 dc in each of next 2 sts, 2 dc in next st) 6 times (24 sts).
Rounds 5–7: Work 5 rounds dc.
Round 8: Change to contrast Yarn D, * 3 ch, 1 dc in first of these ch, miss 1 st, 1 dc in next st; rep from * to end. Fasten off.
Repeat to make another cosy in Yarn A, then make 4 more cosies using Yarn B and Yarn C.
Using a needle and thread sew vintage button to top of cosy.
Syd Rabbit – Errata
there is a mistake on the feet:
UK terms:
Round 3: Ch 1, dc to centre st of 3-tr inc of previous round, 3dc into centre dc, rest of rnd ok, will end with (22 sts).
Round 4: will end with (32 sts).
Round 5: will end with (40 sts).
Butterfly Stitch Purse – Errata
Errata for Butterfly Stitch Purse from Vintage Crochet
Revised and Corrected Pattern, 3-10-08
Approximate measurements: 10cm (d) x 16cm (w)
Materials
Yarn: 1 ball Bel-Air
Colour: col. 3, deep plum
Crochet Hook size: 5mm
You will also need:
Lining fabric x 25cm wide (Bottle Green baby cord used)
Inner Lining fabric x 25 cm wide (Floral linen used)
*1 x modern silver purse frame (med)
*1 x Gutermann Textile Glue
*supplied by u-handbag.com
Using 5mm hook and 31sts make 2 shaped panels as follow:
Approximate measurements: 10cm (d) x 16cm (w)
Materials
Yarn: 1 ball Bel-Air
Colour: col. 3, deep plum
Crochet Hook size: 5mm
You will also need:
Lining fabric x 25cm wide (Bottle Green baby cord used)
Inner Lining fabric x 25 cm wide (Floral linen used)
*1 x modern silver purse frame (med)
*1 x Gutermann Textile Glue
*supplied by u-handbag.com
Using 5mm hook and 31sts make 2 shaped panels as follow:
1st Row: 3 ch., then work in tr. to end of row.
2nd Row: 3 ch., 1 tr., in 2nd tr., *miss 2 sts., 3 tr. in next st., miss 2sts., (1tr., 3ch., 1tr.) in next st.* repeat 5 times, miss 2 sts, 2tr
3rd Row: 3 ch., 2 tr. in 3 ch. space of previous row, *1 dc in 2nd of 3 tr. of previous row, 7 tr. in next 3 ch. space * repeat 4 times. 1dc in 2nd of 3 tr of previous row. 3 tr. in last 3 ch. space
4th Row: 3 ch., 1 tr. in first tr. , * 3 tr. in dc of previous row, (1 tr. , 3 ch., 1 tr.) in 4th tr. of group of 7tr. * repeat 4 times. 3tr into dc, dc in last st.
5th Row: 3ch 1 tr in 1st stitch. *1 dc in 2nd of 3 tr. of previous row, 7 tr. in next 3 ch. space * repeat 4 times. 1dc in 2nd of 3 tr, 3 tr. in last stitch
6th Row: 3 ch 1 tr in 1st tr. * 3 tr. in dc of previous row, (1 tr. , 3 ch., 1 tr.) in 4th tr. of group of 7. * repeat 4 times. 3tr in dc, dc in last st.
Decrease:
7th Row: dc into 3rd tr., * 7 tr. in 3 ch. space, 1dc in 2nd of 3 tr. of previous row* repeat 4 times 1 dcinto 2nd of 3 tr.
8th Row: 3 ch., *( 1tr., 3 ch., 1tr) into 4th of previous 7 tr., 3 tr. into dc * repeat 3 times. dc into 4th st. of previous group of 7tr.
9th Row: dc into 3 tr., * 7 tr. into 3 ch. space, 1dc in 2nd of 3 tr. of previous row* repeat 2 times, miss 1 st. dc.
10th Row: 3 ch., (1 tr., 3 ch., 1 tr.) into 4th of group of 7 tr., 3 tr. of dc, (1 tr., 3tr., 1 tr.) into 4th group of 7 tr. 3 tr into dc., miss 3 st dc. Fasten off.Make up instructions: unchanged
1st Row: 3 ch., then work in tr. to end of row.
2nd Row: 3 ch., 1 tr., in 2nd tr., *miss 2 sts., 3 tr. in next st., miss 2sts., (1tr., 3ch., 1tr.) in next st.* repeat 5 times, miss 2 sts, 2tr
3rd Row: 3 ch., 2 tr. in 3 ch. space of previous row, *1 dc in 2nd of 3 tr. of previous row, 7 tr. in next 3 ch. space * repeat 4 times. 1dc in 2nd of 3 tr of previous row. 3 tr. in last 3 ch. space
4th Row: 3 ch., 1 tr. in first tr. , * 3 tr. in dc of previous row, (1 tr. , 3 ch., 1 tr.) in 4th tr. of group of 7tr. * repeat 4 times. 3tr into dc, dc in last st.
5th Row: 3ch 1 tr in 1st stitch. *1 dc in 2nd of 3 tr. of previous row, 7 tr. in next 3 ch. space * repeat 4 times. 1dc in 2nd of 3 tr, 3 tr. in last stitch
6th Row: 3 ch 1 tr in 1st tr. * 3 tr. in dc of previous row, (1 tr. , 3 ch., 1 tr.) in 4th tr. of group of 7. * repeat 4 times. 3tr in dc, dc in last st.
Bobble Stitch Bag – Errata
there is an error in the pattern between the rows of bobble and cable. There should be a row as follows;
(working from front of fabric)
*1treble, miss 2 tr, 1 raised tr into next 2 tr then work 1 raised tr into the 1st and second tr missed (this forms the ‘mock cable effect’ 1 tr into the next tr 1 tr into the top of bobble repeat from* to the end
This row is repeated alternatively throughout the whole pattern
Lula Bobble Scarf – Errata
Bobble ends
Using Yarn A and 4.5mm hook, 8 ch, turn. Dc in each second st from hook to end. Turn (7 sts)
Row 1: no change (7sts)
Row 2: 1 ch, 6dc, 4dc in last st in row, turn (10 sts)
Row 3: no change (10sts)
Row 4: 1ch, 3dc in first st, 9dc, 3dc in last st, turn (15sts)
Row 5: no change (15sts)
Row 6: 1ch, 3dc in first st, 13dc, 2dc in last st, turn. (18sts)
Row 7: no change (18sts)
Row 8: 1ch, 2dc in first st, 16dc, 3dc in last st, turn. (21sts)
Row 9: no change (21sts)
Row 10: 1ch, 3dc in first st, 19dc, 2dc in last st, turn (24sts)
Row 11: no change (24sts)
Row 12: 1ch, 24dc, turn
Row 13: no change (24sts)
Neck Middle
Change to yarn B.
Row 1: 2ch, htr in next loop, *miss 2 loops, 1cl in 3rd loop*, repeat 6 more times. Miss 1 loop, 2htr in last loop. Turn.
Row 2: 2 ch, 1cl in each of the next 8 spaces, 2 htr into last loop of row.
Turn. Rows 3-8: Repeat last row, ending each with a half-cluster (2htr) into the last space.
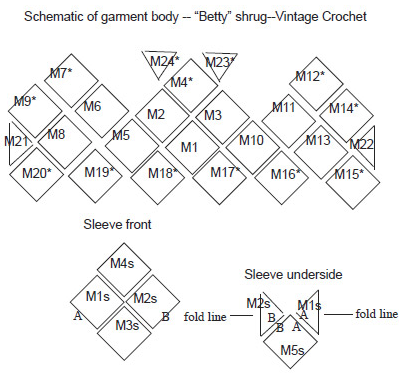
Betty Shrug – Errata ( schematic)